Showing posts with label ramblings. Show all posts

Thursday, May 26, 2011

Totally Non-Stamping Related

So like the title says, this is totally non-stamping related.  But one picture I thought was pretty fun and the other I was pretty proud that I got.  So the first is this poor fly!  My son was about to get on the trampoline and came calling for me asking me what a bee looks like again.  I ask why, of course, and he says that there is a bug buzzing on the trampoline and he isn't sure if it is a bee or not.  I walk out there expecting to find a bee/fly dying on the surface of the trampoline and instead find a fly that somehow managed to get himself stuck in the trampoline netting.  I mean did he fly into in?  Did he not see the netting?  Or did he try to crawl through the opening and ate a bit too much pollen (or whatever it is that flies eat) that day that he got stuck?  So after I grabbed my camera and got a picture of him (which by the way, you can see the little hairs on him...pretty crazy), I helped him get out and he buzzed away happily.


My second photo to share is one that I was really excited about.  One, I finally got a decent picture of my son with his missing front tooth and two, I just love the water splashing around him but he is in focus.  So yay for me and my camera!  


Well that is all for me...just had to share my pics with ya...back to stamping stuff.  Thanks for checking out my kind of engineering!

Thursday, September 9, 2010

Our End of the Summer

So I have been meaning to write this post for awhile. We had such a busy last couple weeks of summer, I thought I would share the highlights. The rest of our summer before was fantastic as well filled with beach visits, camping, family, and friends. But these last few weeks were a great way to end our summer!

To start off our end of summer journey, my son, at the ripe old age of 5, took his First Communion. he had been crying nearly everytime he went up to Communion with my husband (I am always singing with the Praise Band) because he wanted to take it too. When we got a new Pastor at church we thought we could have the Pastor explain that First Communion happens at a defined age (I want to say 3rd grade, but I could be off on that)...instead the Pastor says if he is Baptized and wants to accept the gift of Communion, he is welcome to. Well that one threw us...not the way my church did it as a kid. I think the ELCA Lutheran church may have a different view than the Missouri Synod Lutheran church I grew up in...that or the Pastor has a differnt view. Either way, the Pastor was ok with it. We had my son talk with the Pastor one more time (just to make sure he knew what he was asking for) and we required him to learn the lord's Prayer prior to taking it. SUre enough the little guy learned the prayer in a month. So we got family together and celebrated him taking his First Communion!


Then we headed over to the West side of Michigan to visit a place south of Saint Joseph right on Lake Michigan. My entire family gets together for a trip once a year (beyond the various Holidays throughout the year) and I picked a place called Chalet on the Lake. It was wonderful! Right on beautiful Lake Michigan and a park filled with plenty to do. I gotta tell you...sunsets on Lake Michigan rival anywhere else I have been!


Then when we got back from our trip...I came home to a wonderful package! Since there recently was a big change in teh Paper Makeyp Stamps design team (which is when I was added), we decided to have a Secret Sister swap amongst as many of the team that could participate. This is what I recieved from my Big Sis, Tina Hale! Wasn't she just the sweetest?! Her cards were stunning and I loved the notepad. Then she was generous enough to get me a pad of Basic Grey paper and some beautful ribbon and twine. So sweet! Thank you again Tina!

The final trip of the summer was back to the West side of Michigan again up at Silver Lake. This area has so much to do as well...unfortunately the weather did not make things easy on us, but we tried not to let it stop us! We made it to Michigan's Adventure Amusement Park and had fun through torrential downpours...yeah we were pretty tired of being wet after that day, but we did manage to get about 3 hours at the end of the day without any rain. My husband enjoyed a morning riding his dirt bike on the dunes (only spot in Michigan that allows vehicles on the dunes) while the rest of us braved the major wind that day to see Little Sable Lighthouse. The next day was extremely chilly (especially when we packed more for summer), but we managed some dune jumping and a visit to a nearby petting farm...check out the picture that has a goat, zebra, and a camel all together! They also had a corn maze there in which we let the kids guide us...well not really but we tried to let them think they were guiding us! Then we finishe dthe trip to the Ludington North Breakwater Light in which Adi was allowed to climb to the top...she wasn't allowed to climb Little Sable, so she was super excited to be able to do this lighthouse!

Then we came back and had to get ready for my son's first day of Kindergarten! He was so excited to ride the school bus and had a great first day and week! My daughter was pretty impressed by the bus too because that is all she could talk about too..."Ewijah rode da bus", but she missed him too...always asking where he was. Cutest part was seeing how happy they were to see each other!

So that was my last few weeks of summer. Full of fun! Thanks for checking out my kind of engineering...or travel!

Thursday, January 14, 2010

Pondering

Pondering what you might ask? Well I will assume that you did...I made some what I thought were cool necklaces for my family members (the ladies of course) for Christmas and my husband is encouraging me to try and actually sell them. Now mind you I have never sold anything I have made, so I truly have no idea if anything I make is even worthy to be sold (and the publishing rejections don't help boost my confidence!). So I am looking for some honest feedback...should I or shouldn't I? Would anybody really buy them?

Anyway, let me at least show you what I am talking about. I used Jen Del Muro's Pizza box template to create a box for my necklaces that I gave out. I created a little insert for the inside that actually held the necklace in place. So first up is the box...can you tell I am stalling out of fear either way of what you might think?! I was making a lot of these, so I kept it as simple as possible. Stamped the snowflake in Night of Navy ink and matted it to Pale Plum. I attached a little bit of Night of Navy sticking out underneath so I could put the recipents name on the box. The Brocade Blue panel is embossed with the Cuttlebug Snowflakes embossing folder. For teh sides of the box, I just put a strip of Pale Plum so it wasn't plain. I topped off the snowflake with a rhinestone sticker in the center.


This is the box open revealing the necklace inside. The Pale Plum is the insert that I created to hold the necklace in place...sort of like a real jewelry box. The necklace is a washer necklace with a cotton cording and a metal bead. A close-up of the necklace shows I used a crackle finish to the surface to give it some more interest.


So what do you think? Just in case you needed to see more to make a decision, here are the others I made as well and me wearing one so you can see what they look like on:


I have ideas for variations of these, so I think I could do a variety...and I have even thought about getting a metal stamping set to stamp names/sentiments on the back side. So anybody want to buy one? Do I have something that is sale worthy? Seriously I need some honest feedback to know if I should go to the level of making a bunch and putting them up on Etsy or even building a website to sell them from...then even the thought of local stores...ahhh I don't know what to do! Like I said...pondering...

Thanks for checking out my kind of engineering!

Thursday, September 3, 2009

Final-Days-Before-School-Starts Activity & The SU! News

Well my summer is winding down now. My son starts 4 year preschool (only 3 mornings a week) next week. That means more of a routine and the fact that I probably have to start getting up a little bit earlier so I can get a shower in before the kids get up...ugh! My late night stamping habit that I have gotten into is not going to make that very easy! So we will see how that goes!

This week, we have stayed very busy trying to get the last bit of true summer activities in before school starts, but 2 weeks ago we were struggling with what to do. I found this idea to make marshmallow structures on a great blog called "The Idea Room". Amy (the blog owner) has lots of great projects and tidbits on her blog, so I highly recommend checking it out. Anyway, just a bag of mini marshmallows (mine were stale so I was going to be throwing them out anyway) and toothpicks and we had a fun activity for about an hour! Eli really got into making his "house" and seemed to really be enjoying himself! So of course I took some pictures to share with all of you! I think I might have even enjoyed it more than him...my engineering roots showed through, in particular my focus on structure design!

Now onto the final portion of my post. I know most (if not all) of crafty blog readers or SCS fans have seen the announcement from Stampin' Up! regarding its demonstrators...or at least have seen the rumors. I will admit that when I first started looking into it, I had a bad first reaction and I wasn't sure I would continue on...sort of out of principle. Well for those that may have no idea what I am referring to, in short, Stampin' Up! is asking all of its demonstrators to re-sign their Independent Demonstrator Agreement with the new changes. The new changes basically say that SU! demonstrators may no longer promote, market, or sell competitive manufacturers products on any form of electronic media (blog, email, Facebook, Twitter, etc.). This means no other stamp companies' Design Teams if you want to remain a demonstrator. Ok, if they would have just said that, then I would have said no problem right away...I am not on any Design Teams (although I tried a few times). Well SU! decided to go further and say that demonstrators cannot link to competitor's websites where people can buy their products. This is where it gets a little sticky for me. I am not the "Career" demonstrator type...I am the lowly "Hobby" demonstrator. This change makes sense and is welcomed by those Career demonstrators because talking about something other than SU! could hurt their business. But as a Hobby demonstrator, I am very aware of the "competitor's products" and like them, so I purchase them on occasion and try to win them or whatever. Then I use those products on cards and scrapbook pages and show them here...mind you these are all personal cards and such...not like I am going to show these at a workshop or class or anything that is related to my Stampin' Up! "business". When I show you a project, I like to be complete with the supplies I used and the manufacturers...this is the gray area of the new agreement. I am taking it though that if I don't directly link you to that manufacturer where you can buy the product when I create the project, then I am in the clear...I will still continue to give a complete supplies list. I still have slight issue with SU! regulating what I can link to on my own personal blog, Facebook, etc...especially since I don't really use my blog to advertise my SU! business (I do on occasion, but it is not my main focus), but I understand the intent. Well this was suppose to be the short story...think it was a little longer once I started typing...but, in short, I will remain a demonstrator right now unless other opportunities begin to arise for me elsewhere in the crafting industry (ahh, I can dream!) that goes against the new agreement. If you want to read more about all of this (and not all of the rumors and negative feedback!) check out Jan Tink's blog where she recently posted about it after Stampin' Up! clarified a lot of the changes that caused the most amount of uproar (and they actually changed the wording so it isn't quite as strict as was first introduced...the big one for me was that I could potentially design for a store or display, but I cannot promote it...I was thinking about looking into this for local scrapbook stores...not that I have, but ykwim!). Thanks Jan for helping to sort it all out!

Sorry no crafty post today...I will show something next time. Thanks for checking out my kind of engineering!


Tuesday, July 7, 2009

Oh My Goodness and a Road Trip

So I may use a little space here as a little therapy session...if you would rather not hear me whine, skip down to the next paragraph. Still here...oh thanks! Let me start by saying I love my baby girl so very much...have to remind myself of that sometimes especially on days like these! So she seriously needs to start talking already...she is 13.5 months old now and all we really get are "doggie", maybe "duck", maybe "car", and a lot of mamamamamama (which may or may not relate to me!). The reason I say this is because the poor thing has no way of communicating with me besides screaming! Problem is all of the screams sound the same...LOUD! I have tried and am still trying signing with her, but she does not seem to get it nor has she ever attempted to show me a sign. I got to the point today I yelled at her to stop, which startled her, then she did stop screaming (yeah!), but then started crying (which is close to screaming!). Ahhhh, I just want her to start talking, signing, or something so that we can communicate better with each other! My son was an early talker, so I didn't have this issue with him....I am so struggling right now! Ok enough of my therapy session...on to the subject at hand.

First for my "Oh My Goodness" portion of the title of today's post. I got some very exciting news recently! Spellbinder's (the makers of the Nestabilities) blog had a Blog Frenzy last week to showcase their new Pendants and Borderabilities (all of which are very cool!) and you could enter each day to have a chance to win that days Pendant and matching Borderabilities...and if you entered all of the days, you had a chance to win the Grand Prize of all of the new Pendants and Borderabilities. Well guess what....I WON the GRAND PRIZE! Check out all of the cool stuff I won HERE! It is so exciting to see my name as the winner...I just couldn't (and still can't) believe it!

Now for the Road Trip portion of the post...my family is headed on a trip this weekend to southern Ohio. This will be the longest trip I think we have taken with the kids, so I have been trying to come up with ideas to keep Eli (Adi is too young for all of this) entertained without too many DVD's and such. Allison Fillo was kind enough to send me a link to a Road Trip game that you try and count up the number of each vehicle you see. So I took that idea and made it into a Road Trip BINGO. So as we are driving along, we will play BINGO with the things we see. It sounds like it should be fun...I will let you know how it goes when we get back!

Thanks for checking out my kind of engineering!

Sunday, June 21, 2009

Father's Day Fun


How about some yummy burgers? What?! Do those leaves look a bit too bright green?! Well that would be because they are not hamburgers, but mini dessert burgers! I saw these on another blog and found the recipe HERE and decided that they would be a fun thing for my son and I to make for Father's Day. I despise coconut though (which is what the recipe called for to make lettuce), so we just used green frosting with a leaf tip. Eli just thought it was so funny that we were going to eat "burgers" for dessert! My husband was actually nervous to eat them because the burger, ketchup, and mustard look so real. The bigger picture gives you a better picture of the actual size of them...think vanilla wafer size...that is what makes up the "buns".


Well I hope all of you had a nice Father's Day...or at least were able to make those Dads feel special. My husband got treated very well today...I even mowed the lawn for him! He has been traveling all week and the lawn was getting crazy out of control, so he said he was going to mow it today...well I can't let him mow it on Father's Day...so I got out there and did it. I probably looked pretty funny because I am not used to driving the riding lawnmower...I was a bit jerky! The highlight of my husband's day was having the kids see his hockey game and he scored 2 goals (something he says that he hasn't done in awhile).

Now I will leave you with a cute pic I took of me and Eli...love that kid! I will have a card post in a bit. Thanks for stopping by my engineering world!


Monday, June 1, 2009

Flower Birthday


Well I will warn you that this post may make you faint from all of the adorable cuteness I am going to show you...ok that is just my not-so-humble biased opinion!  I will try and put the actual crafty stuff up front so if you really don't want to see the cuteness, you can skip it...but really, why would you when I am talking extreme cuteness!  

So two weekends ago (wow has it already been that long!) we celebrated my daughter's 1st birthday.  I have been admiring the Women of Life set from Papertrey Ink for awhile, so I decided to get it and make by daughter's birthday around it.   So first up is the invitation.  Pretty sure that I did not use a sketch challenge for this, but honestly I use them so much, I am not sure!  The color combo (Rose Red, So Saffron, Certainly Celery) was what I put together to get a spring feel to the invite.  I scalloped the bottom strip of Certainly Celery to give it a grass feel for the flowers.  I popped up one of the flowers (actually made it bigger than the others) and added a "1" to it.  I then printed the inside with all of the party details...btw, anyone have any recommendations of printers that will easily print on cardstock?  I have to print mine a half of a page at a time and even then I still get jams!  

The Engineering Details
Stamps - Women of Life (Papertrey Ink), Dot Alphabet (bought at WalMart); Paper - Rose Red, So Saffron, Certainly Celery, Basic White (Papertrey Ink); Ink - Rose Red, So Saffron, Certainly Celery, Basic Black; Accessories - Swiss Dots Cuttlebug Embossing Folder, Scallop Edge Punch, So Saffron 5/8" Grosgrain ribbon, dimensionals


I recently created the thank you card that I will eventually be sending out...I want to include my daughter's 1 year pictures which have yet to be 
taken (huge GASP from anyone that knows me...I cannot believe I am this late either...I am so the type that gets these pictures taken as close to the actual birthday as I can).  Stuck with the same color combo and elements, but just went with the one large flower with "Thank you" over it.  For this one I did use a Mojo Monday Sketch Challenge for the the layout:  MOJO88.  I created a little background paper with the extra leaf stamp in the Women of Life set on the Certainly Celery behind the flower.  

The Engineering Details
Stamps - Women of Life (Papertrey Ink), Noteworthy (retired); Paper - Rose Red, So Saffron, Certainly Celery, Basic White (Papertrey Ink); Ink - Rose Red, So Saffron, Certainly Celery, Basic Black; Accessories - Swiss Dots Cuttlebug Embossing Folder, Scallop Edge Punch,Certainly Celery 5/8" Poly-twill ribbon, Circle and Scallop Circle Nestabilities, Ticket Corner Punch, dimensionals


For the actual party, we had about 14 kids or so ranging in ages from 6 months to 13 years old.  So I tried to come up with a craft that all of them could potentially enjoy (well except for the babies...they just don't have that coordination thing down yet!).  

I had them paint small clay pots and then go through the activity of planting a flower in their pot.  I later tied a ribbon and a name tag to their pots.  My Mom helped me pre-paint the 4 babies pots since they were not going to be painting.

It turned out good and I think the kids all had fun with it...now I just hope that all of the flowers survive...mainly the two for my kids...I so do not have a green thumb!! 
O.k. so now on to the cake for the party...don't worry the extreme cuteness is yet to come!  I really do love to decorate my kids cakes and I love it even more when it coordinates with the invitation or theme of the party.  For Adi's cake, I tried to use the invitation as my inspiration.  It turned out pretty much like I envisioned it...the flowers on the side of the cake were a bit of a challenge and they could definitely be better.  I used a really large tip for them and I could get a really pretty flower if I was doing it vertically, but for some reason trying it horizontally just 
did not want to work real well.  Oh well, this is probably where practice makes perfect right?!  


The color red on the cake was the only other issue I had...I really wanted it to be the color Rose Red like the invite, but after a whole bottle of one color and some additions of other colors, I just could not figure out how to get there...felt like I needed a color degree or something to know what drop of color would get me Rose Red from the color I had.  It was definitely pinky-red, but just not quite the right shade...something only I noticed I am sure!  The side view of the cake shows the not-so-great flowers that went around the whole cake.


Now you can see the extreme cuteness that is my adorable daughter...again in my not-so-humble biased opinion.  So the first picture shows her with her cake...I love the look on her face...kind of a look of concern (like what is happening) and kind of a look of disbelief (you are setting that in front of me?!).  She didn't blow the candle out and I did not leave the whole cake in front of her in case you were curious!  We cut off a piece of the cake and let her go to town.  


She quickly went to this (frosting anyone?):


And this:


And this (yes she actually did touch my camera...she was quicker than I thought she would be!):


Ok pick yourself up off of the floor after fainting from the extreme cuteness so I can leave you with some extreme sweetness.  Happy Birthday once again to my sweet Adilane Rose!  Thanks for stopping by my engineering world!

Wednesday, July 30, 2008

Getting Back in the Game...Sort of!

It has been a long time! Things are going well at home with two kids, but we seem to constantly be adjusting...figuring out what works. Every day is different it seems, so there isn't a "normal" yet. Adilane is getting bigger and stronger all the time and Elijah continues to be the "Big" brother that is sweet and loving one minute and then he turns crazy and almost out of control the next! Believe me, I have a new found appreciation for Stay-at-Home Moms! In fact I have questioned if staying home is the right decision for me a couple of times...those were just the really bad days though!


Anyway, I actually found a little time yesterday to stamp! I was so very excited to do something creative...and I finally broke out my Cuttlebug that I have had since Mother's Day! Right now I feel pretty mentally and somewhat physically exhausted by the end of the day, so my creative juices have not been flowing! I am way behind on some cards for friends and family so I am attempting to catch up. To help speed things along (since my time is apparently limited) I am relying heavily on sketch challenges and color challenges. Less thinking for me!


So this card uses a sketch challenge from Julee at Poetic Artistry - Mojo48 (she always has great sketch challenges every Monday) and a color challenge from last week on SplitCoast Stampers (CC175 - Almost Amethyst, Wild Wasabi, So Saffron). I decided to try the die and embossing set that comes with the Cuttlebug machine. I have to tell you...I love my Cuttlebug and I know what to get so much more for it! It was so easy to use and the results were incredible! I altered Julee's sketch a smidge because I lent out my circle punches, so I went square instead.


I used the die to get the "postage stamp" square and then embossed the cupcake on the three colors and pieced them together. A little diamond Stickles finished off the cupcake. I don't have much Wild Wasabi or Almost Amethyst paper, so I had to keep it to a minimum. Luckily I still have the Designer Series Paper from the Hostess Benefit Prints Pack which contained Wild Wasabi! Mellow Moss Grosgrain ribbon actually does a nice job of matching the Wild Wasabi. Not much else to say...fairly basic but it felt good! Oh and I did a second card that I will post later!!!


The Engineering Details


Stamps - Everyday Flexible Phrases; Paper - So Saffron, Almost Amethyst, Wild Wasabi DSP from Prints Pack, Shimmer White; Ink - Versamark; Accessories - Cuttlebug, Cuttlebug Celebration Die and Embossing Set, Corner Rounder Punch, Diamond Stickles, Moss 1/4" Grosgrain Ribbon

Wednesday, May 28, 2008

Introducing Adilane Rose Vernagus

Adilane Rose Vernagus

Sorry for my absence recently...our lives have permanently changed recently. At 3 weeks and 1 day early, we welcomed our daughter into the world! She came into the world very quickly (only 2.5 hours after my water broke and contractions started!!) and has melted our hearts instantly! We are at home and adjusting to the new family dynamics. So far my son, Elijah, is doing well in his Big Brother role...likes giving her kisses, wants to hold her, and tries to help out. Adilane (Adi for short) is doing well and is just too sweet! I hope to eventually hit my stamping area, but it may be a little bit as I learn to adjust to my new schedule and life!

The Engineering Details

Birthdate - May 20, 2008; Time - 8:27 pm; Weight - 7 lbs, 1 oz; Length - 20 in


The Best Big Brother!

Our New Family

Sunday, May 18, 2008

For my Son

Using Beate's Weekend Sketch Challenge 48, I created this special card for my son. Well the card itself is not anything earth-shattering, but the sentiment behind it is the important part. This is a card for my son from his soon to be born baby sister. The inside (didn't take a picture because it really is nothing beautiful) says "Thank you for being my BIG BROTHER!".
We are having Baby Girl give her Big Brother a gift (Lightning McQueen Car...something he wanted) and this card. Knowing that she will be getting a lot of gifts, we wanted to make sure that he doesn't feel left out. It is a big moment in his life too afterall!


Anyway regarding the card, I stamped the crocodile and flower in Craft White ink and then rubbed pastels over top...think this is called the chalkboard technique. I think it probably would have looked better on darker cardstock, but my son will still like it. Gave the croc a heart (from the Happy Heart Day set) and popped it up on dimensionals and made it sparkle. Not much else...everything I think it pretty self-explanatory.

No consistent contractions yet! Just some Braxton-Hicks contractions sporadically. My girlfriends and I went and had pedicures (they are both pregnant too), so now I have pretty feet all ready to go! Just waiting for Baby girl to decide it is time!
The Engineering Details
Stamps - Wild About You, Happy Heart Day, Crosshatch (retired); Paper - Handsome Hunter, Mellow Moss, Barely Banana, Ruby Red, Kraft; Ink - Handsome Hunter, Ruby Red, Basic Black, Craft White; Accessories - Stampin' Pastels, Q-Tips, Scissors, Diamond Stickles, So Saffron Brads, 1/16" Hole Punch, Dimensionals

Whoa Nelly & a Late Mojo Sketch

This will be a somewhat quick post, as my computer is being very slow and therefore very frustrating! Trying to run a disk cleanup, so hopefully that speeds things up once it is done.

Anyway, I am late in posting my take on the Mojo Monday 37 Sketch Challenge. I made the card for some dear friends 6th Anniversary...Happy Anniversary Eric & Stephanie! As usual, I didn't get them the card until their anniversary had past, but I was only 2 days late. That is actually pretty good for me!

I am really trying to use patterned paper...I think I have mentioned I am pattern paper challenged...so I am pushing myself to use it so I can get used to it and hopefully get better! I like how this card turned out. Fairly basic: the flower was colored with pastels and a Q-tip, I used a white gel pen to add white dots along the edges of the Taken with Teal cardstock to mimic the pattern that was in the Bali Breeze DSP. Beyond that, I just added some antique gold brads and ta-da, a beautiful anniversary card.

The Engineering Details
Stamps - Doodle This, Everyday Flexible Phrases; Paper - Taken with Teal, Pumpkin Pie, Rose Red, Whisper White, Bali Breeze DSP; Ink - Taken with Teal, Basic Black; Accessories - Stampin' Pastels, Q-tips, Pumpkin Pie 1/4" grosgrain ribbon, Antique Gold brads, White Gel Pen, Dimensionals

Now on to the Whoa Nelly part of my post! I had my 36 week appt on Wednesday last week, and the doctor surprised me with the information that I am already 2-3 cm dilated and 60% effaced! Whoa Nelly! Things seem to be progressing along too...won't give you any details...but I have a feeling that Baby girl may be coming this week! Needless to say after that news, I have been frantically getting stuff ready for her arrival and getting my pre-baby checklist completed! Wow...still in shock a little! I will keep you posted!

Sunday, May 11, 2008

Busy just not Posting

Wow it has been awhile since I posted! A little bit more time than I planned…oh well! (Edited to Add: I had this entry ready to post quite a few days ago, but just now got to posting it...but I will have more posts very shortly) Things have been a little hectic around our house and I have been trying to get to bed early to get enough sleep…all of which cuts into my stamping time! We finished grouting the tile in our bathroom (so now my husband can start putting up the drywall and maybe get a toilet and sink back in there), we visited Ludington, Michigan and climbed to the top of the Big Sable Lighthouse, my husband started another MBA class, and we had another ultrasound! All good stuff, just made for very busy times.

I did create some projects for a Friday Stamp Nite Out I am holding at my house on Friday, May 23 (if you are in the Southeast Detroit area and would like to attend, let me know…I will send you the Evite which has a preliminary picture of what we will be making). I am trying to squeeze one last event in before our baby arrives…hopefully she doesn’t come before then so I can still hold the event! Since I technically need a couple of supplies to finish the projects, I won’t post them here until I get the supplies and can officially finish them. But they are really great…at least in my humble opinion!

I plan to work on a birthday card and Mother’s Day cards in the next couple of days, so I will be posting those fabulous creations once they are done. Until then I will leave you with some great pictures from our last couple of weeks:

Our baby girl at 34 weeks…only 5 weeks now (or less!) to go!!


My boys at the top of Big Sable Lighthouse…love ‘em!
Wednesday, April 23, 2008

A Thank You

I haven't had much time lately to be very crafty...kind of killing me! I have a growing list of projects I want to work on, but haven't gotten to them. I also have a list of challenges or contests that I want to participate in, but alas I keep missing deadlines due to that lack of time thing lately. Probably has something to do with catching a cold and also caring for my sick son as well...although he got better already, but my cold is still around. Ugh!
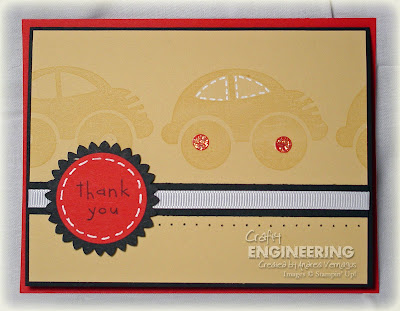
Well I did manage to finally get my son's 3rd birthday thank you's completed. I wanted them to have elements from his invitations which you can see here. By the way, did you see the awesome cake I made him that matched his invitation...you can check it out here. I tried to keep them simple so that I could make 16 of them. Basically the car is stamped in So Saffron ink on So Saffron cardstock. I added a strip of black cardstock and some white grosgrain ribbon beneath the cars and added a little "Thank You" circle over top of the ribbon. The starburst circle was created by double punching a scallop circle...punch the cardstock once with the scallop circle punch, then attach it to some thin paper, and punch again with the scallop circle punch so that it is offset from the first set of scallops. I kept the sparkly circles on the wheels from the original invitation and matted the So Saffron cardstock on Basic Black cardstock. I wanted the whole thing matted on Real Red, but I was running low, so I only matted the base of the card. This is probably a little easier to tell in the second picture where it is open some. Finally I added some pierced holes and some white gel pen to accent the image.


The Engineering Details
Stamps - By Land, Happy Heart Day; Cardstock - Real Red, Basic Black, So Saffron; Ink - So Saffron, Basic Black; Accessories - White grosgrain ribbon, Scallop Circle Punch, 1-3/8" Circle Punch, 1/4" Circle Punch, Paper Piercer, Mat Pack, White Gel Pen

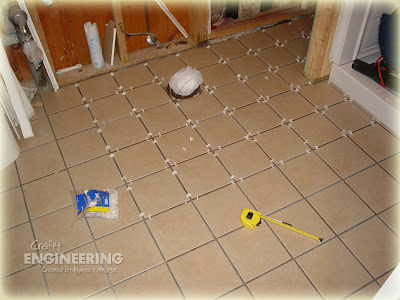
Well besides being sick, what else could a 8 month pregnant woman be doing? Laying tile in a bathroom, of course! Seriously! I have been on my hands and knees laying tile in our basement bathroom (which has been under construction for over 3 years!). We did do it in 2 sessions, thankfully, but I was definitely feeling sore the days after! But it is exciting to finally see this bathroom getting completed, so I will endure a little pain! Still a little way to go before it is done, but having the tile in is a huge step...although I still have to grout it...ugh! Oh well!! Have a great week!!

Wednesday, April 2, 2008

SAS Masculine Card Transformation

In my effort to stay on top of upcoming birthdays and using up cardstock that I had cut for an event, I decided to try another card transformation. These cards were based on this card that my class attendees did at my Stamp-A-Stack back in February. I have one person's set of cardstock cut for that event that never got used (someone cancelled due to being sick), so I am trying to use it up. I didn't quite use it all up, but I did manage to get a few birthdays cards for some guys.


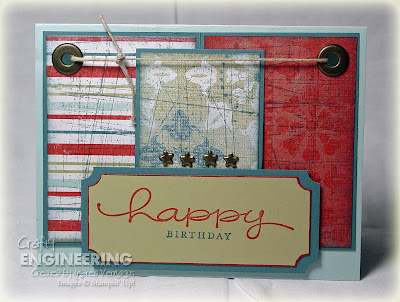
The first card is not the one I like the best. It turned out o.k., but for some reason is not really doing it for me. I used two of he large panels, one of the small panels, and the greeting that you can see on the original. I added some star brads from Oriental Trading and some hemp twine to dress it up a bit. The panels were "distressed" the same way we did in the original: stamped with the Sanded background stamp in Blue Bayou ink on the Western Sky DSP and then the edges are all sponged. Instead of sponging the greeting, I outline the River Rock piece with the Ruby Red marker. O.k. now on to the one that I feel actually turned out!


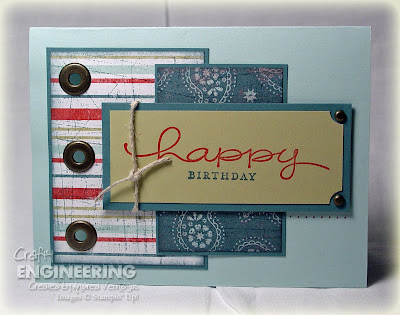
This card works for me much better. I used one large panel, one small panel, and the greeting from the original. Couldn't find a place for the photo corners, so I removed those. The panels were "distressed" as I described above. I changed the greeting to only have ticket corner punches in two corners of the the River Rock layer and added Antique Brass brads to the corners of the Blue Bayou layer below. I added a little hemp knot on the other side of the greeting. The final addition was to add a row of Ruby Red dots on the bottom side of the greeting. Since this one felt pretty good, I actually made two of this version.

I have some more projects to show later this week (probably the weekend)...the cards and such that I made for a workshop I have on Friday for a good friend. I don't do workshops very often (about once a quarter), so I always get a little nervous for them. It is much easier though knowing it will be basically my girls that I hang out with all of the time...so actually the challenge here is to keep the workshop flowing without chit-chatting the whole time. Anyway, I will share those after the workshop...want to keep them surprised!

Now I need to go to bed. I think the 3rd trimester tiredness is starting to set in...either that or my body is still adjusting to the low carb diet and is going through sugar withdrawal! I was diagnosed with Gestational Diabetes...I was totally expecting it since I had it with my first pregnancy, but it is still hard adjusting to the restrictions. I just try and look at it like I can eat anything i want, I just can only have so much of it. So I have to decide if it is worth how much of a meal it takes up to have it...I can't be going hungry!!! Have a great rest of the week!

The Engineering Details
Stamps - Happy Everything, Sanded; Cardstock - Soft Sky, Blue Bayou, River Rock, Western Sky DSP; Ink - Ruby Red, Blue Bayou, Ruby Red marker; Accessories - Antique Brass Jumbo Eyelets, Ticket Corner Punch, Photo Corner Punch, Antique Brass Star Brads (Oriental Trading), Antique Brass Brads, Hemp twine; Supplies - Dimensionals, sponge

Monday, February 4, 2008

Baby Update and a New Look

Well I hope you all don’t mind me sharing pictures and such about my life instead of just stuff I have stamped. I love blogs out there that allow you to get to know some of the people beyond their work. So anyway, I wanted to share with you a couple of the latest ultrasound pictures of our baby GIRL! That is right, we found out that Elijah is going to have a baby sister…officially and conclusively! So excited! Anyway I have two pics for you, the first one is the standard ultrasound pic. She (wow that is weird to now be able to reference the baby as she and not it!) seems to always have a hand up by her face or head. In all three ultrasounds now, she has been that way…so sweet! The second is using the 3-D technology! Pretty cool, but maybe a little freaky too. She is pressed up against the uterine wall in the shot and she looks quite gaunt as basically at this point in the pregnancy (20 weeks) she is just skin and bones. The technician said the next ultrasound will give more “adorable” typical baby pictures.


Did you notice the new look to the site? Or are you still looking at that 3-D ultrasound pic…captivating isn’t it? Well, my husband got me Photoshop Elements 6.0 for Christmas and I finally took some time (o.k. a lot of time because I am still figuring this program out!) to create a new bog header! Be nice…it is my first one. It is not the greatest, but I thought it turned out pretty good. So it will be around for awhile…probably until I get a bit more skilled with this program! I have also started adding a watermark to my pics…did you notice? I have been adjusting it here and there, but I am pretty pleased with it. Well that is enough for me. I will be posting some fabulous creations that I did over the weekend soon…I had lots of stamping time (and I am working on revamping my stamping area...stay tuned as that develops!) as my husband and son were out of town! But since they took the camera, I had to wait till they got back to take my pics!
Related Posts with Thumbnails