Showing posts with label Valentine's Day. Show all posts

Thursday, January 20, 2011

Moody Love

One more post before I check out for the night...see I told you I have been busy with these fun color challenges! This one is for the Moxie Fab World Metallics Color Challenge in honor of Paper Crafts Color Inspiration special issue. I used the Mojo Monday Sketch Challenge #174 for my layout.

I got the Couple of Moodies from Paper Makeup Stamps recently and wanted to get it inky. It is perfect for Valentine's Day or maybe even a wedding...basically anything love themed! I went for the less is more in the coloring area and I kinda like it! The cutie couple was embossed with gold embossing powder and I just colored the swirlies behind them with the Pink Pirouette marker. The hearts are chipboard hearts embossed with gold embossing powder as well. The final touch of gold was the scalloped piece that was embossed in gold that is behind the white panel. Speaking of the white panel...I actually used shimmer white, but you totally cannot tell in my pic. Hard to get a picture of that shimmer white I tell ya! The pink bow was my final touch. I kept thinking the card was too simple, so I stamped some text on the base pink cardstock tone-on-tone style...perfect touch.

That is all for me tonight. Thanks for checking out my kind of engineering!

The Engineering Details
Stamps - A Couple of Moodies (Paper Makeup Stamps), By Definition (SU! - retired); Paper - Pink Pirouette, Shimmer White (SU!); Ink - Pink Pirouette and Pink Pirouette Marker (SU!), Versamark (Tsukineko); Accessories - Heart Chipboard (SU!), Gold Embossing Powder (Ranger), Pink Satin Ribbon (Offray), heat gun, dimensionals


Wednesday, December 22, 2010

A Slice of Published Cake

Ok I have to pause in my massive cleaning efforts (Christmas is at my house this year) to gush just a little bit! My latest project that was selected for publication just came out! So be sure to open up the January/February 2011 Issue of Paper Crafts to page 49 and check-out my cake slice box (with my name in print!!). You can download the patterns for the box HERE (follow the link and then scroll down). It looks like the flower on top shifted some in shipping, so my pic above shows how the flower was meant to be. Either way...I am so excited!!!

Hoping to get one last Christmas card related post in before Christmas and then I get to prepare for hosting Christmas...and then a New Year'e Eve party too! Until then, thanks for checking out my kind of engineering!

Monday, March 1, 2010

Red Mittens

Good Monday morning to you all! It is only lunch time and the day has been interesting already! The daughter woke-up happy but early...you know what that means. Yup, cranky city! So lots of crying and difficulty this morning. But then I come home from grocery shopping to find a very sweet surprise...this card was one of the winners of the Paper Crafts February Gallery Challenge! Holy cow! That brightened my day a little bit!

I made this card about a month ago during the Mini VSN (Virtual Stamp Night) on Splitcoast Stampers. My friend Stephanie (her card is below) joined me for a fun filled stamping evening. This was for the Red Mittens Challenge where we were to use a Red and White color combo and incorprate yarn in honor of the Red Mitten worn during the 2010 Winter Olympics.


Since this was before Valentine's Day, I decided to make mine a Valentine's Day card. This heart is from a long retired Stampin' Up! set called Love Always. But I so love the heart, so I cannot part with it! The heart stamp has the word LOVE already on it (you can see that in Stephanie's card below)...I just glued my yarn over top of the word. The yarn completely covered the word, so it almost looks like I am super crafty and made an embellishment on my own...oh well just crafty to think to put the yarn there I guess! The cut strip behind it is the Spellbinder's Lattice Borderabilities Petite. The rest of the card was kept simple mainly due to the 45 minute time constraint that you are to honor during the VSN....just goes to prove that "winning" cards don't have to take a ton of time...a lesson I really should remember more often!

Well that is really it for me...still can't believe it got picked! Anyway, check out Steph's card too for the same challenge and thanks for checking out my kind of engineering!

The Engineering Details
Stamps - Love Always (retired SU!); Paper - Real Red, Whisper White; Ink - Real Red; Accessories - White yarn, Lattice Borderabilities Petite (Spellbinders), scissors, dimensionals

Saturday, February 6, 2010

Big Heart Valentine

Just a quick post...well as quick as I can be sometime! I need to be getting things done so that I am ready to leave for a Florida vacation on Monday. It is not super warm where I am going, but it will be warmer than here! My sister and I are taking my kids down to visit both sets of their grandparents (my parents and my husband's parents both"winter" in the same location). So with the grandparents around, I am hoping I might get to sit back and relax for a little bit too!!

Anyway in keeping with my quick post idea...this is my card using the current Mojo Monday Sketch...Mojo Monday Sketch Challenge #124. I actually did a little double duty on this card. One I got the Valentine's Day card done for my son (now to remember to pack it with me!), I participated in the Papertrey Ink Anniversary Challenge to do the emboss resist technique, and I got my Mojo on! Yeah me! Anyway the image is from Happy Heart Day from Stampin' Up! Sorry you are seeing a lot of this one...I think it is one of my few Valentine themed sets! The heart image is from an old SAB set, Mini Messages. I did the emboss resist technique on the background behind the elephant...wasn't planning on the whole heart cloud thing at first, but I like how it turned out that way! I did a little cut grass under my elephant (that was embossed and cut out by the way) and tried to repeat the cut grass look below the sentiment...think I got more of a grass skirt look there, but fun nonetheless. The red panel was embossed with the Cuttlebug Heart Blocks embossing folder. I think that about sums it up for the card.

Have a great remainder of the weekend...I need to get packing. I am a little nervous about flying with my kids...I have never flown with them before. Thankful my sister is coming along, but still nervous my daughter is going to scream (and mind you she can hit octaves and decibels I have never heard before...and probably won't be able to hear again because she does this kind of screaming right into my ear) the entire flight. Wish me luck! Thanks for checking out my kind of engineering!

The Engineering Details
Stamps - Happy Heart Day, Mini Messages (SU!); Paper - Whisper White, Bashful Blue, Real Red, Green Galore (SU!), Basic White (PTI); Ink - Versamark, Bashful Blue, Real Red; Accessories - Stardust Stickles, Cuttlebug Block Hearts Embossing Folder (Provo), Oval Nestabilities (Spellbinders), white gel pen (Signo), stitched red grosgrain ribbon (unknown), dimensionals, scissors

Round Happy Heart

It is Sweet Stop Time! That means it is time for Sweet Stop Sketch Challenge #42. This was a fun one...but a little hard at the same time! A round card...very cool, but not something I do very often (if ever)! I decided I need some more practice at watercoloring...especially with the Aqua brushes. Feeling a bit more confident with them now...way too much water was coming out my first time. I think I did a bit better job this time and I even included the light grey outline around the image to help it pop a little off of the page. You can see how I did in the detail shot...be kind though, I am still working on this! My image is from the Happy Heart Day set from Stampin' Up! and is stamped in Brilliance Graphite Black. The patterned paper is Sweet Love - Big Love by Little Yellow Bicycle. The ribbon is some that I picked up in the dollar aisle (might have been the $2.50 section) at Jo-Anns around Halloween time last year. I just love how sparkly it is!


Now the thing that stands out most on this card are the very cool and very big flowers. I love the look of them...do you think they are too big? I think I like the fact that they are so over the top! But they are big and thick, so this is definitely not a card to mail and maybe not even put in an envelope! This will be my son's teacher's Valentine card (in addition to the one that he will make himself...gotta give a nice one too), so it will be hand delivered. Anyway, I take no credit for the idea of these gorgeous flowers. Mercy Kerin at Lord Have Mercy posted a tutorial on how to make them...so fun and easy! You can see the amount of dimension they add in my detail shot...like I said, not very mailable! The card was finished off with some red sticker rhinestones...found mine in the jewelry section of Jo-Anns. The main circle was then mounted on a scallop circle that forms the card base...hint it is actually two scallop circles with one that has a score mark near the top, then they are adhered together above the score line, so the bottom one is what allows it to open...did that make sense?


Oh and did you hear, there are two new Sugar Babies! Please welcome Lisa Hjulberg and Nancy Brown! Now go check out what they and the other Sugar Babies have created: Ann, Audrey, Candace, Jodi, Julie, Lisa, Nancy, Nicole, Renata, and the Sugar Mama, Korin. Better yet, make your own card with the sketch and link it up to the Sweet Stop Sketch Challenge Blog! Word is that the "powers that be" are looking through all of those submissions to find the next Guest Designer for the Sweet Stop...so get your project linked up!! Thanks for checking out my kind of engineering!


The Engineering Details
Stamps - Happy Heart Day (SU!); Paper - Sage Shadow, Pink Passion, Real Red cardstock (SU!), Sweet Love-Big Love pattern paper (Little Yellow Bicycle), watercolor paper; Ink - Brilliance Graphite Black (Tsukineko), Sage Shadow, Pink Passion, Real Red, Close to Cocoa (SU!); Accessories - Circle and Scallop Circle Nestabilities (Spellbinders), 5 Petal Flower Punch, Scallop Edge Punch (SU!), Sparkle Red Ribbon (Wyla), Red Rhinestone stickers (unknown), scoring blade, aqua brush, dimensionals

Saturday, February 14, 2009

Fishy Valentines

Well Happy Valentine's Day to all! I am enjoying a relaxing day with the family and looking forward to a heart-shaped pizza (hopefully I can make it look like a heart!) and dessert for dinner and a romantic evening with my husband (once the kids are in bed!). I hope that all of you have a great day as well!

Thought I would just pop in to show that last couple of projects I did with my son. They weren't anything huge, but I liked how they turned out. The first one is the Valentines that he took to preschool. I found the idea on the Family Fun website, so I take no claims that this is my original idea. I cut out all of the hearts (really considered getting the hearts Nestabilities, but I held back) and my son helped me glue them together, glue on the eyes, and then he signed the back of them. I printed the sentiments on the cardstock prior to cutting out the hearts: "You are oceans of fun!" and "Best fishes this Valentine's Day!". The cute font has hearts, stars, and flowers in it...found that at Simply the Best Fonts. Pretty simple and fun...plus they were Valentines that he "made" instead of the store bought ones!


The second project we did was a gift for Daddy and Grandparents. We had some large foam Heart shapes, so I cut out some cardstock in a slightly smaller heart, and then printed out small pics of the kids. Glued them all on the cardstock heart and then glued it to the foam heart. Added a magnet on the back for fridge display! For this one, Eli just helped me decide which picture went where and then placed the small heart foam stickers...he loves stickers!

If you need some more Valentine inspiration for those last minute Valentines, check out the Blog Carnival at Craft Critique! So much inspiration and ideas there, it is crazy. My Mickey Mouse Valentine card is in there, which I am proud to say that I made it in Julee's (Poetic Artistry and Mojo Monday Contest author) top 20 cards out of like 300 or something...didn't win, but I was glad that I made the top 20...maybe one of these days I will win that contest!

Anyway, have a great day and weekend. I need to work on samples for my upcoming Stamp-A-Stack (live in the Detroit area and want to come??...email me!) over the weekend...maybe tomorrow!

Thursday, February 12, 2009

Warm Java Valentine


Only a couple more Valentine projects from me. In my next post I will show the remaining things that Eli and I made for a gift and for his classmates. But for now, this is a card for his teacher with a little java gift inside. I used Julee's Mojo Monday Sketch Challenge #73 for the layout.
I knew I wanted to use the coffee mug and saying from Pun Fun since I was going to give her a small gift card. So I stamped the mug twice in Bravo Burgundy ink and pulled out my Stampin' Pastels (which I feel have been very neglected lately) to color the image. I loved how it turned out...so soft and warm...like a wonderful cup of coffee!
The pretty satin pink ribbon was some scraps that I had, so I am not sure where it is from...same with the button. The button was probably one of those extra buttons that sometimes come with shirts and pants. I tied the button to the ribbon with some hemp twine...a lovely addition if I do say so myself.
I did decorate the inside so that it could hold the gift card I got her. I just added the bottom panels and stuck 'em on with some sticky strip tape on 3 sides so that the gift card could be placed in there.
Anyway that is all for now...I am off to figure out our new AT&T U-verse service that just got installed. Excited for the DVR capabilities, but I hate that I have to learn all new channels!
The Engineering Details
Stamps - Pun Fun; Paper - Kraft, Bravo Burgundy, Whisper White, Bittersweet DP (Basic Grey); Ink - Bravo Burgundy; Accessories - Stampin' Pastels, Pink satin ribbon (source unknown), button (source unknown), hemp twine, dimensionals


Monday, February 9, 2009

Kids Valentines

This post has nothing to do with stamping, but it does have something to do with card-making...just card-making kid style! I wanted to have my son help make some Valentine's Day cards for grandparents and Daddy. I know it probably goes against all true card-maker vows or something to not make the cards myself, but I wanted him involved, but wanted them to be cute at the same time. So I did some searching for ideas and found an idea for Feet Hearts on the Family Fun website. They said to trace the feet, but after a couple of attempts with my son, we weren't having much luck...and just imagine trying to keep my 8 month old's foot still long enough! Not a chance! So I decided to slap some paint on the bottoms of their feet and made some footprints instead! Love them!!! I cut them out and printed the sayings. My son helped turn the Cuttlebug handle to cut out the sayings and the scallop squares. Then he helped me place the squares and the foam heart stickers (he loves to put stickers on things!) and I had him sign the backs of them (well he is still learning that one, so I might have to tell the recipient that what is on the back is suppose to be his name!).


Anyway, I loved how these turned out and wanted to share with you. I am going to have him make another kind for his preschool classmates...if those turn out I will post them as well. On a side note, my son really does have 5 toes on his right foot...although the footprint makes it look like he only has 4!! His second toe kind of curls and sits on his third toe, so it kind of blended with that one. Kind of funny though!


Thanks for visiting!

Friday, February 8, 2008

Valentine Gifts

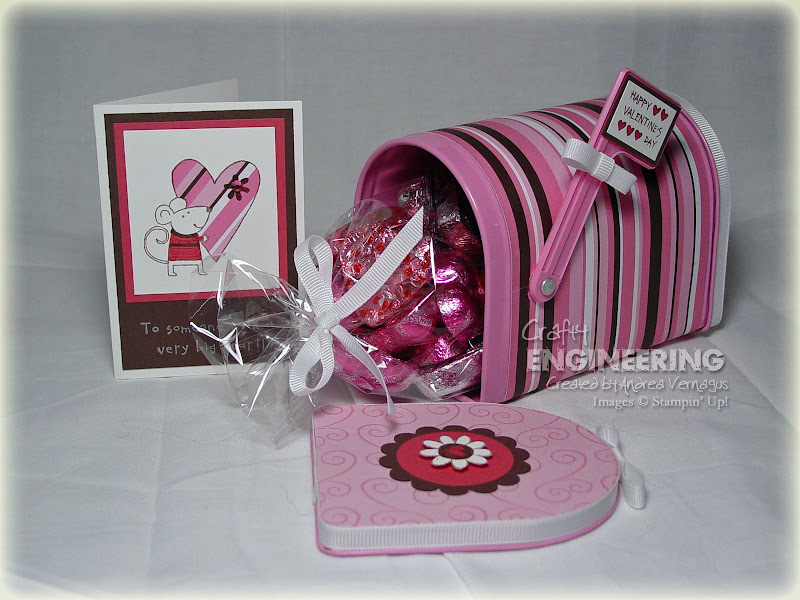
In addition to the Valentine’s Day cards for the kids at my son’s daycare, I wanted to make some little gifts to give to the girls that care for my son…he loves them so much and they are so wonderful to him! I have seen all over in blogging land, the Target $1 mailboxes that are out for Valentine’s Day. So I headed over and picked up a bunch and also hit Jo-Ann’s to find some Valentine’s Day patterned paper.

The mailboxes are really cute and very easy to cover. I used a 4” x 12” strip of patterned paper to cover the main body of the mailbox and I adhered it using sticky tape. My only tricky part was to punch a hole for the flag…I read before that a ½” circle punch works great for that, but alas I do not have one. So I used a ¼” circle punch and just tried to “make” a ½” circle. Not the prettiest, but I think it worked with out being noticeable. Then just traced the lids of the mailbox onto another sheet of patterned paper and adhered that using Modge Podge…although I think the Tombow Liquid Metal or Multi-purpose Adhesive would work better (but I don’t have any) because the paper could be easily peeled from the lid…just hoping it isn’t handled too much! Then I just decorated the edges of the lids with ribbon again adhered with sticky tape. The little bows were created via inspiration from Nichole Heady’s blog and her instructions here. It makes a nice clean inline bow for a strip of ribbon. I added a little extra decoration with some of the images from the Happy Heart Day stamp set, but I didn’t want to overwhelm the mailbox so I kept it simple.


Then, the best part…I filled it with chocolate and a matching little card. I used the mini note cards from Stampin’ Up! that I realized fit perfectly in the little mailbox. The image in the card is again from the Happy Heart Day set and I paper pieced the heart using the striped paper. Colored the shirt of the mouse and the flower on the heart with Rose red and Chocolate Chip markers. A little Rhinestone sticker (Icons Stickers by Me & My Big Ideas available at Jo-Anns) finished it off! Again kept them simple, but I thought it turned out cute. I hope they like them!

I made a second set with a little bit less girly colors to give to my husband and son. Similar matching card to finish it off...with candy of course!


The Engineering Details
Stamps – Happy Heart Day; Ink – Chocolate Chip, Rose Red Marker, Chocolate Chip Marker; Cardstock – Pink Striped (DCWV From Jo-Anns), Pink Swirl (Sandylion Sticker Designs From Jo-Anns), Rose Red, Chocolate Chip, Whisper White; Accessories – Scallop circle punch, 1-3/8” circle punch, white ¼” grosgrain ribbon, Target $1 Spot mailbox; Supplies – sticky tape, Modge Podge, scissors


Tuesday, February 5, 2008

Weekend Sketch Challenge in the Nick of Time!


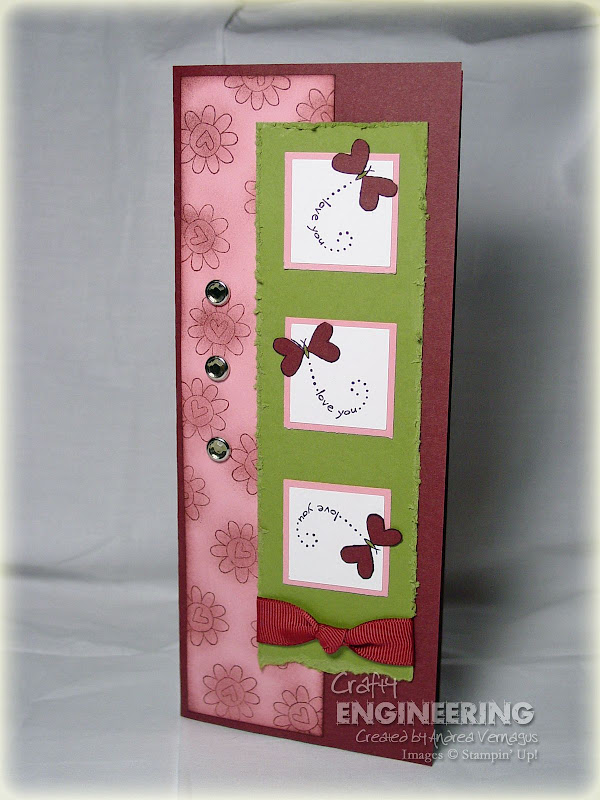
I am always running late on getting Beate's Weekend Sketch Challenges done in time...not sure why, but I always am. Almost did not get this one done in time too even though I had the idea in my head as soon as I saw the sketch, but due to my son and husband being sick today, I stayed home to care for everyone and got it done during nap time. It is looking like I may be home again tomorrow...they weren't looking too good as they fell asleep tonight!


Anyway, I love this sketch even though tall cards are a little out of my comfort zone. I also decided to incorporate the SCS Color Challenge color combo too...woohoo double challenge! I have been playing a lot with the Happy Heart Day stamp set (as you will see on my blog) and thought about the butterflies flying around the squares as soon as I saw the sketch. The are stamped in black and then I paper pieced the wings in Baroque Burgundy. The Old Olive background piece was distressed on the edges and torn at the bottom. I added the 5/8" Baroque Burgundy grosgrain ribbon with a knot at the bottom, but decided against adding the tag...just wasn't feeling what I would put on it. The side Pretty in Pink piece was stamped with Baroque Burgundy ink and sponged with the same ink. I didn't have any patterned paper that would work so it was my attempt at making it myself. Thought it turned out pretty good. I like the addition of the Rhinstone brads...although it took a little convincing of myself to part with 3 of them on one card! Not much complicated here, but I am pleased.

The Engineering Details
Stamps - Happy Heart Day; Ink - Baroque Burgundy, Basic Black, Old Olive Marker; Cardstock - Baroque Burgundy, Pretty in Pink, Old Olive, Whisper White; Accessories - Ice Rhinestone Brads, 5/8" Baroque Burgundy grosgrain ribbon; Supplies - sponge, scissors

Monday, February 4, 2008

Valentine Elephant

I freely admit that I went a little bit overboard on this. Looking at the card, you may think how could I call that overboard…simple design, not a lot of layers, a little glitter, but not too much embellishments…but now I tell you that these Valentines are for the other kids in my son’s daycare. So they will be going to children 5 and under. Now you think I went overboard, don’t you? I got a little caught up and was having fun…so oh well!

I love this little Elephant from the Happy Heart Day set. I love elephants in general and this little guy is no exception. Since the Valentines are from my son, I tried not to make it too girly hence the color choice of Ruby Red, Old Olive, and Going Gray. I colored the elephant with watercolor pencils and a blender pen and the flowers/hearts with markers. The scalloped edge at the bottom of the gray is made with the 3/16” Corner Rounder punch…kind of a tedious process for 22 cards, but I persevered to get it done! Then of course the heart that the elephant is holding just screamed for some glitter even though it is from a boy…its Valentine’s Day…how can I deny the little heart glitter?!

I made a few incomplete versions of this card that I am planning on having my son finish for grandparents and Daddy. Once I do that, I will show you his version.

The Engineering Details
Stamps – Happy Heart Day; Ink – Basic Black, Ruby Red Marker, Old Olive Marker; Cardstock – Going Gray, Ruby Red, Very Vanilla, Old Olive; Accessories – 3/16” corner rounder punch, rectangle slot punch, Always Artichoke ¼” grosgrain ribbon, Watercolor pencils, Icicle Stickles; Supplies – blender pen, paper piercer


Related Posts with Thumbnails