Showing posts with label workshops. Show all posts

Friday, July 31, 2009

Make-n-Take Cards


Remember how I had a little therapy session a few posts ago? You all were so nice...giving me advice and just plain sympathizing with me! Adilane is now walking holding on to one hand (instead of two),so I am sure she will be walking soon. She has learned to point at what she wants recently, so the screaming is not as frequent as it was...not much still in the talking department, but we are getting by!

I am finally getting to showing you the Make-n-Take cards that I had everyone do that came to the New Catalog Kick-Off party I had last week. It went very well and everyone seemed to like these two cards.

The first one uses the Branch Out set...on a side note, I was totally freaking out when I got my new catalog and didn't see it in there, but it wasn't on the retiring list, finally they released the dormant list (last year for it thank goodness) and it was on there. Since it is one of my favorite sets, I came up with this simple card to allow them to play with it. Going for a summer feel with the Garden Green and Summer Sun color combo. To give the tree a little bit more interest, I did the Rock-n-Roll technique with Creamy Caramel and Chocolate Chip. Nothing else too crazy here...simple with a little bit of extra detail.


The second one used the Circle Circus stamp set and the new In Colors. This was just one color combo I did for a sample, but everyone got to choose the colors that they wanted to use. The medallion was just stamped in black and then colored in with the In Color markers. I love the little bit of texture that the textured cardstock added to the card. Finally a greeting form Sincere Salutations and a couple of white gel dots finished the card.

That is all for now...I have lots to show sometime in the future, but right now I am actually going to submit them (probably just jinxed myself just by admitting that...oh well!). Thanks for checking out my kind of engineering!

The Engineering Details - Celebrate Life Card
Stamps - Branch Out, Sanded, So Many Sayings (retired); Paper - Garden Green, Summer Sun, Creamy Caramel, Chocolate Chip, Whisper White; Ink - Creamy Caramel, Chocolate Chip, Garden Green, Summer Sun, Basic Black; Accessories - Round Corner Punch, Word Window Punch, Sponge, Paper Piercer, Mat Pack, dimensionals

The Engineering Details - Birthday Wishes Card
Stamps - Circle Circus, Sincere Salutations; Paper - Rich Razzelberry, Dusty Durango Textured, Bermuda Bay, Whisper White; Ink - Whisper White Craft, Basic Black, In Color Markers; Accessories - 3/4" Circle Punch, 1-1/4" Circle Punch, 1-3/8" Circle Punch, Scallop Circle Punch, White Gel Pen, dimensionals

Sunday, July 26, 2009

Colorful Circles

Wow it has been awhile since I have posted anything! I had a New Catalog Kick-Off Party this weekend, so I had been busy preparing for that. I will show what I had everyone make (nothing earth-shattering, but I think they liked them) later this week. I made some other stuff too in there, but not gonna show you quite yet...actually going to try submitting for publication and a contest...well I have some more to do for that though, so I should probably get busy.

This is a simple card I made for display at the event this weekend. I am pretty sure this was inspired by something I saw in the Demonstrator magazine, Stampin' Success...I don't think it was a complete copy...but I am honestly not sure. Anyway, very simple but I liked how it showed off the new In Colors (which I love!) and the Circle Circus stamp set.

Well I am off to learn some songs and motions for Vacation Bible School...I am Song Leader Lady again this year! Thanks for checking out my kind of engineering!!

The Engineering Details
Stamps - Circle Circus, Happy Everything; Paper - Bermuda Bay Textured, Dusty Durango, Whisper White; Ink - In Color Markers; Accessories - White Taffeta Ribbon, Fire Circle Rhinestone Brads, Scallop Edge Punch, dimensionals

Thursday, June 25, 2009

Workshop Cards

I haven't gotten to much stamping yet this week. I finally got my daughter's 1st birthday thank yous done and mailed out, so that felt good. I was waiting to send them until I had her 12 month pictures to include in them...well silly me never took the time to put them together prior. So when I finally got the pictures back, I still had to make them, write in them, and include the pictures. Oh well, all done now, so hopefully I can get some stamping in. I believe my SU! order is coming tomorrow, so maybe it will be with new stuff...yippee!!

So last week I tried my first Mystery Hostess Workshop. It didn't go over as well as I had hoped it would, but I have not given up on it completely...yet. I figure I will try it one more time. The good news was that I didn't need to buy my entire quarterly minimum to remain active...just some of it. Anyway, back to the subject at hand. These are the two Make-n-takes that I had the ladies do. The first one was mainly the puffy box in which the directions I found on SCS. A cute little box that wasn't too terribly difficult to make. We stamped a full 8.5 x 11 sheet of cardstock though, so I decided to cut up some of the leftover from the box to make a matching square card. I thought it turned out nice and I loved the color combo: Old Olive, Elegant Eggplant, and Cameo Coral.


The second card that they made was meant to teach them how to watercolor with SU! markers (a new found love of mine!). The ladies loved the technique of watercoloring! Too bad I am a sucky demonstrator sometimes and used a set that I believe has been retired since January! What was I thinking?! Seriously I feel like I missed the whole 2009 Spring/Summer Catalog. I totally thought the Summer by the Sea set was just on the Dormant list, but when one of the ladies actually was interested in buying it, I quickly found it nowhere and realized it must have retired prior to that catalog. Bad demonstrator, bad! Oh well...I love this set, so it will not leave my collection, but it does now have one of my bright dot stickers on it to remind me that it is indeed retired!

Both cards are very basic, so nothing much to say about them. Hoping to get the current Mojo sketch done this week...we will see. OH did I tell you....I WON! OK it was a random draw, but I still WON! Verve Stamps was doing a Guy themed Project Parade and all you had to do was link a guy themed project of your own. So I did and myself and another blogger (in a crazy coincidence I "met" her the day before) won a Verve Stamp Set. I love Verve Stamps so I am excited to choose the one I want. Thanks for stopping by my engineering world!

The Engineering Details - Puffy Box & Card
Stamps - Eastern Blooms, Upsy Daisy; Paper - Glossy White Cardstock, Cameo Coral, Elegant Eggplant, Old Olive; Ink - Cameo Coral, Elegant Eggplant, Old Olive, Whisper White Craft; Accessories - Old Olive grosgrain ribbon, dimensionals

The Engineering Details - Watercolor Boat Card
Stamps - Summer by the Sea; Paper - Watercolor Paper (Walmart), Close to Cocoa, Creamy Caramel, Ballet Blue, Ruby Red; Ink - Black Stazon, Close to Cocoa Marker, Creamy Caramel Marker, Ballet Blue Marker, Ruby Red Marker; Accessories - Watercolor paintbrush, Dimensionals, Paper Piercer, Mat Pack

Monday, April 14, 2008

A Gift for My Hostess, My Friend


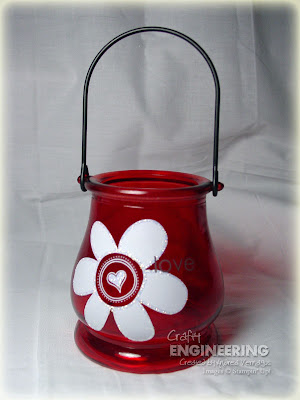
My workshop over the past weekend was for a dear friend of mine, so I wanted to give her a small hostess gift that I thought she would really like. I don’t do the extravagant hostess gifts that I have seen some other demos do…I have a hard time finding the time or the money, but I like to give them either some product that I know they will use or a homemade gift that they would like. I went the homemade gift route with this one. I had no idea what I was going to make until I stopped at Target the weekend before. There in the $1 Spot were these adorable little glass tea light lanterns. They had red and clear that I remember. My friend loves red (we both have the exact same red couch…I still claim I bought mine first, but we honestly found it at the same time since we were furniture browsing together) and she has it throughout the house in various places. So of course I chose the red lantern.

I am still getting used to the rub-ons, but I knew I wanted to try them on the glass lantern. So I applied the large white flower from Love & Happiness Rub-on collection that was part of SAB this year. Well, even though I thought I was being careful, it did not come out centered. So I added the little LOVE quote in Chocolate Chip Rub-on to the one side of the flower. That definitely helped even it out…so yes, of course, I meant to and had that planned all along! Then I added some Diamond Stickles around the edges of the flower just to dress it up a little.

I think she really liked it, so I was pleased! Then she gave me a present…how sweet is she?! A box of sugar-free chocolate! Ahh the perfect gift for the gestational diabetic! Even though I still have to eat it sparingly, I love having an option at the end of a meal to have a piece of chocolate! Well that is all for now…I am tired once again. Am I really going to be tired for the next 2 months?!? I don’t remember quite having this extent of 3rd trimester tiredness with my first pregnancy, but I am struggling to get through days without a nap right now…not real convenient especially since I work all day! Oh well! Have a great week!

Saturday, April 5, 2008

Small but Fun

This may be hard to believe, so you may want to sit down...I actually did a workshop over the weekend! It ended up being very small, but I think that everyone had fun! We even had a brand-spankin' new newbie in our small group...so I hope I didn't overwhelm her!! I am not the type of demonstrator to do a lot of workshops...I basically do one a quarter. Not that I turn them down, I just don't have a huge customer base that does the workshop thing. I like to do the stamp camps and such in my home...probably because it is less of me talking!

Anyway, I thought I would share with you the projects that I demonstrated at the workshop...I thought they turned out pretty good and actually showcased quite a few types of products (but then again that might be what overwhelmed the newbie!). The first thing I did was to transform a simple paper lunch sack into an adorable little gift bag. How cute is this!! This is the first time that I have done this...where the idea came from (confident that it is not my own) though I have no idea...probably from someplace in the blogging world. This just used simple stamping in three colors to create the "patterned paper" on the bag which was matted a few times. I used the slit punch to add a scalloped edge to the top of the bag and the bottom of the greeting. Add a couple pieces of ribbon and you have the makings of a cute gift inexpensive gift bag.

The Engineering Details
Stamps - Time Well Spent; Cardstock - Very Vanilla, Perfect Plum, Brocade Blue, Sage Shadow; Ink - Perfect Plum, Brocade Blue, Sage Shadow; Accessories - Blue Grosgrain Ribbon (I think technically it was the French Blue retired one), Antique Brass Brads

The next thing I did was this card. It was meant to show SU! patterned paper, with coordinating rub-ons and stamp sets, and a little bling! A really simple card, but I think it came out quite striking at the same time.

The small piece of Bali Breeze Designer Series Paper is layered on some Old Olive cardstock and I paper pierced a line of holes above and below that strip (using the awesome Mat Pack that I could not live without now that I have it!). I layered the flower image from A Beautiful Thing on top of squares of Old Olive and Apricot Appeal. The corners were punched with the Ticket Corner Punch just to give it some interest and I added a little bling to the center. Lastly some rub-ons from the Eastern Elegance collection was added above and below the strip.

The Engineering Details
Stamps - A Beautiful Thing; Paper - Bali Breeze DSP, Old Olive, Apricot Appeal, Taken with Teal, Whisper White; Ink - Apricot Appeal, Taken with Teal; Accessories - Eastern Elegance Rub-ons, Ice Circle Rhinestone Brads, Paper Piercer, Mat Pack, Dimensionals, 1/16" Hole Punch, Ticket Corner Punch

I love the Pun Fun set, so I just had to use it! This was one of the Make-and-Takes that the ladies did. The main focus here was to give them some experience coloring with Blender Pens and Ink. The birdie was stamped in Basic Black and colored with ink pads and a blender pen. I read about more people actually using the reinkers, but I just squeeze the ink pad together to get a small pool of ink in the lid to dip the blender pen into. We used some punches to create a little frame for our birdie and added a bow. The Barely Banana frame was popped up over the birdie just to give the card some more dimension.

The Engineering Details
Stamps - Pun Fun; Paper - Pink Passion, Barely Banana, Mellow Moss, Whisper White; Ink - Basic Black, Pink Passion, Barely Banana, Mellow Moss; Accessories - Scallop Circle Punch, 1-3/8" Circle Punch, Dimensionals, Mellow Moss Grosgrain Ribbon, Blender Pen


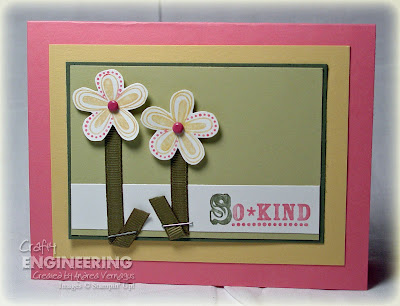
This was the other Make-and-Take that I had them do. I got the adorable idea for using ribbon for the stems of the flowers from another blog and for the life of me, I thought I remembered which blog, but I just checked it and I couldn't find the card I remember! Anyway, I don't take any credit for the cute idea, but I will use it again!

This card showed using markers on the stamps and then I threw a little of the Marker Misting technique that was recently featured on SplitCoast Stampers for a little variation. Basically just inked the flowers and greeting with the markers, misted them with water, and stamped them on Whisper White cardstock. Added a brad to the center of the flowers and popped them up. Then added the ribbon as the stems and used a staple to keep the ends of the "stems" down. Other than that, we just added color with layers.

The Engineering Details
Stamps - Priceless; Paper - Regal Rose, So Saffron, Always Artichoke, River Rock, Whisper White; Ink - Regal Rose Marker, So Saffron Marker, Always Artichoke Marker; Accessories - Rose Red Brads, Dimensionals, 1/16" hole Punch, Scissors, Stapler

Well that was my workshop. I will post my Hostess Gift in another post as this one is quite long now! Have a great rest of the weekend!!
Related Posts with Thumbnails