

Monday, July 5, 2010

Paper Makeup Stamps Sneak Peek


I am so excited! This is my first Sneak Peak for Paper Makeup Stamps (PMS) and what a great release to begin with! There are all sorts of great new stamps being released this month, but I will admit I am partial to these fairies! They are just the cutest! So with great pleasure I introduce you to the Maya Fairy. I was told she is suppose to be a more "ethnic" fairy, but really she is great for all. In fact when I saw her and her outfit, for some reason I saw "Punky Brewster"! Does anyone else remember that show...it was a favorite of mine when I was younger. Well I looked up a picture of her (from then, not now) and I really have no idea why I thought this originally...she had pig tails with s light wave in her hair...not the curly hair in Maya Fairy. Oh well, the inspiration was still there.

Anyway, I chose a piece of pattern paper from the Rockstar Mat Stack from DCWV to get my color scheme. I stamped Maya on two pieces of watercolor paper. One I cut out with Oval Nesties and the other I actually watercolored and cut out the fairy minus the wings. Then I glued the cut-out one on top of the Oval cut one so she is a little thicker giver her some dimension....plus it allows her to come outside of the oval some too! And you know as I was cutting her out, I realized you could totally use her without the fairy wings if for some reason you didn't want to do the fairy thing one time.

To finish the fairy off I, of course, had to add some Stardust Stickles to her wings (what is a fairy without a little sparkle?). Then I added some white star brads around and coated them with stardust stickles as well. Final touch was a sparkle white ribbon. And you know what...now you may need to sit down for this one as it may be a HUGE shock...I did not use a sketch for this! See aren't you glad I told you to sit down! Shocking, I know!

Now you need to check out the sneak peeks by the other design team members over at the Paper Makeup Stamps Blog...be prepared to be wowed! Make sure to leave a comment to be entered to win the stamps being shown today! Then join us on July 7 for a special Blog Hop and at 9 pm EST for the Release Party! We will be partying away in our FORUM with games, prizes, chatter, and all around good times! Hope to see you then and thanks for checking out my kind of engineering!

The Engineering Details
Stamps - Maya Fairy (PMS); Paper - Soft Suede Textured, Rose Red, Pink Passion, Cameo Coral (SU!), Watercolor Paper, Rockstar Mat Stack (DCWV); Ink - Black Staz-on, Soft Suede marker, Rose Red marker, Cameo Coral marker, Pink Passion marker; Accessories - Oval and Scallop Oval Nestabilities (Spellbinders), Stardust Stickles, white star brads (Oriental Trading), sparkle white grosgrain ribbon (Offray), paintbrush, dimensionals, scissors

Friday, July 2, 2010

Dancing into the Weekend


I am going to totally admit that if anyone were to watch my house through the windows, they would totally see some dancing. Dancing of all kinds...ballet, head-banging, or simple just gettin' down...and I am sure it is not done well! If I am alone and cleaning and have the music nice and loud, you may see even more dancing. Even my kids will dance...we have little dance parties sometimes. Pretty darn funny! So this little ballerina fairy, Marissa, just spoke to me and yeah, I like to "Dance as if no one is watching".

So this is my first Makeup 4 the Weekend Challenge #33 (from here on out this will be shown as M4TW because that is a lot to type!) and I love the idea that it is a different type of challenge every week. While I am partial to sketch challenges, it is fun to play with other challenges too. I am usually a one challenge per card type of gal, but I went CRAZY with this card and made if for not 1...not 2...but 3 challenges! Yup, got a little crazy, but I think it worked out. So the M4TW Challenge was to make a window card...this is where my people walking by my house seeing me dancing through the windows discussion came from...so I chose to put my ballerina on the inside with a square window to see her from the front of the card. I almost did actual window panes, but I was afraid it would cover her up too much. I used Jen Del Muro's Sketch For You To Try from last Saturday...can't go without a sketch right?!

My color scheme came from the Moxie Fab Tuesday Trigger Pleasing Palette inspiration picture. I loved the cup in the picture as well (shown below) and the Turquoise color was just so bold. So those are the primary things that I put into my card. Then I used some pinks and greens to accent with. The orange stripes were made by crumbling the more solid orange paper from the Green at Heart Basic Grey collection, flattening it out some, rubbing it with Whisper White craft ink (to get the ridges of the crumbling), and then embossing with white embossing powder. I love the way it looks...not sure it really fits with the card though, but I was going with the inspiration picture! The fairy was colored with a blender pen and ink pads.

So now, I encourage you to check-out all of the samples for the M4TW Challenge #33 and get creating! Once you are done link it up to the Paper Makeup Stamps Blog so that we can all see your amazing work! Thanks for checking out my kind of engineering!

The Engineering Details
Stamps - Marissa Fairy (PMS), Beautiful You (Verve); Paper - Tempting Turquoise, Rose Red, Whisper White (SU!), Green at Heart Collection (Basic Grey); Ink - Black Staz-On, Tempting Turquoise, Really Rust, Rose Red, Regal Rose, Mellow Moss, Blush Blossom (SU!); Accessories - Blender Pen, white embossing powder, heat gun, pink pearl stickers (Oriental Trading), white satin ribbon (Offray), Scallop Border Punch (SU!)


Wednesday, June 30, 2010

Time to Spill the Beans!

Photobucket

I get to finally spill the beans! As my design team assignment with Sweet Stop Sketch Challenges ended, I got word that I was chosen to be one of the new "Makeup Artists" for Paper Makeup Stamps! I am so very excited and totally honored that Katie (the owner and all-around awesome girl) felt I was worthy! So now I get to proudly state that I am a Makeup Artists...which my close friends are now chuckling because I hardly ever wear makeup! So be on the look-out for those fantastic Paper Makeup Stamps...sneak peeks of the July Release will be coming up soon!!! Please help me also congratulate the other new "Makeup Artists" that are starting along with me:
 Anita Hovey
Bonnie Sharp
Ginger Schwerin
Michelle Van Patten
Sherry Campbell
Stephanie Zito
All of the girls (old and new) have been so amazing so far...a whole lotta chatting going on behind the scenes...and I have been loving every minute of it.  So I am very excited to show you the many reasons I love Paper Makeup Stamps....and I just hope I can match the quality that the other Makeup Artists can produce (let me tell you, they are amazing!).  So hang onto your seats, this is going to be fun!  Thanks for checking out my kind of engineering! 

Sunday, June 27, 2010

Life is Good...Well it Could Be Better


Ahhh, I am late...I am late...I am late for an important date! See life seem to have gotten in the way. This week I managed to get a cold during the summer, so I allowed myself to rest a few days, but then realized I was now behind on my commitments. So I managed to get this card together for the Sweet Stop Challenge before leaving for a camping weekend, but I didn't get it posted until now. What is worse is this is my last Sweet Stop Challenge as a Sugar Baby...so wouldn't you know it with my luck, I am late! I got it in on time for the Sweet Stop blog, just failed to get it here in time. So as my time with the Sweet Stop Sugar Babies ends, I thank them all for a fun 6 months and I especially thank Korin for giving me this awesome opportunity! I have had a blast and I know you will see me again...as I really do have a hard time making a card without a sketch anymore!
So we are now at Sweet Stop Challenge #62! I was trying really hard due to the "not feeling well" and camping stuff I mentioned above to keep this card simple and quick...yeah it definitely wasn't quick! Think part of it was the "not feeling well", but not sure why this was difficult to pull together. Anyway I started off with a rub-on from the Eastern Elegance collection (retired SU!) and adorned it with red rhinestone stickers. I pulled out the Raspberry Tart DSP (again retired, but oh so loved) as used that for my other layers. The giant sparkle red rhinestone sticker is from Bazzill...love that thing! My last details to make the card complete were the little groupings of red rhinestones at the bottom and on the skewed piece and the row of white dots along the horizontal piece.

So now go check out the creations by the other Sugar Babies (and bid a fond farewell to those others that are leaving): Audrey, Candace, Dana, Julie, Kathy, Nancy, Renata, and the Sugar Mama, Korin. Better yet, make a card with this week's sketch and link it up to the Sweet Stop blog. Stay tuned to the Sweet Stop blog to also see who the next Sugar Babies will be...I am sure they will inspire you! Thanks for checking out my kind of engineering!

The Engineering Details
Stamps - None; Paper - Rose Red, Cameo Coral, Whisper White, Raspberry Tart DSP (SU!); Ink - None; Accessories - Eastern Elegance Rub-ons (SU!), Red Sparkle Rhinestone Sticker (Bazzill Basics), Red Rhinestone stickers (Darice), Scallop Border Punch (SU!), Red Sparkle Ribbon (JoAnns), White Gel Pen, dimensionals

Tuesday, June 22, 2010

Teacher Gift


My attempts at being productive have not been working out very well lately! See, the kids are visiting their Oma and Opa (my parents) for a few days so it is suppose to be a productive time for me...alone. Yesterday I did my shopping (except groceries which I still need to do)...new running shoes, lawn bags, and shoes for an upcoming wedding I am in. The last one proved to be the hard one and has made me hate shoe shopping! I was told a black pump/peep toe style shoe...doesn't sound that hard right? Wrong! I literally have gone to every store I could looking for something that 1) fit, 2) didn't make me feel in excuriating pain (seriously how do women wear some of these shoes?!), and 3) weren't too expensive! And you know what else I found out...stores that have multiple locations don't carry the exact same selection! Go figure. So now I have 3 pairs of shoes...1 pair that I like they way they look, but I am not sure I could make it 10 minutes in them (or maybe my toes will just go numb so I won't have to worry about it), 1 pair that are not quite as hurtful as the first pair and not quite as nice looking (and a little cheaper), and 1 last pair that look cool to me and are actually comfortable, but I am nervous they won't look right with the dress. They are more of a fun style...not a classic style. Ugh! SO three pairs later and I still am not sure what I am wearing. Anyway, that took literally ALL day yesterday and today I have been cleaning, but it is going slowly as I am not very motivated. Hoping this cup of coffee gets my butt in gear...hate to waste alone time!

Sorry for my lamenting there. I so needed my girlfriends with me on my shopping trip but they all had their kids with them...never quite sure I should trust what the sales people are telling me! So I made this little Post-It note holder for my son's end of the year teacher gift. We donated towards the class gift, but I always want to give something homemade too. Basically you decorate one of those cheap acrylic frames and put a pad of post-it notes on the outside. I started off with some random pattern paper that I had because it had some yellow in it to go with the yellow post-its...note to self to find where you can get cuter post-its if I ever make these again. So I will freely admit my color scheme is a little wonky, but i went with it. Basically just put a quote from the Teacher's Apple set from PaperTrey Ink and stamped and cut-out some apples. The turquoise apple is actually on the outside of the frame to give it a little interest. Finished off with some black grosgrain ribbon and I had a nice little teacher gift.

Exciting things are afoot, but I am not at liberty to discuss them yet....but soon! Until then (or sooner), thanks for checking out my kind of engineering!

The Engineering Details
Stamps - Teacher's Apple (PaperTrey Ink); Paper - Tempting Turquoise, Ruby Red, Barely Banana (SU!), random pattern paper; Ink - Basic Black, Ruby Red, Tempting Turquoise (SU!); Accessories - black grosgrain ribbon (SU!), acrylic frame, post-it notes, scissors

Saturday, June 19, 2010

A Sweet Father's Day


My poor husband is not getting as much as a Father's Day as I have done for him in the past. Trying to stain the deck and fit in visits with our fathers is not leaving a whole lot of time for him! Plus he already has his gift! Oh well! The kids will make him a little something so hopefully that makes him feel better. What plans do you have?

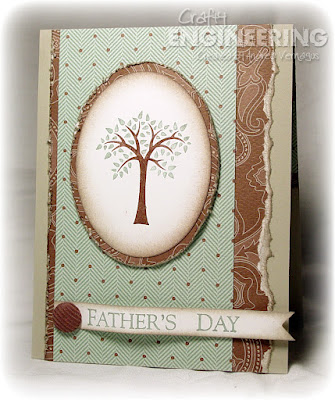
Well speaking of Father's Day, I of course needed some cards! So I turned the Sweet Stop Sketch Challenge #61 into a Father's Day card...and looking back on it, I see I not only turned the sketch, but changed it a little as well. Well it is suppose to be a starting point, right?! Anyway, I colored the tree stamp directly with markers and stamped it on Whisper White cardstock and then cut it out with oval Nestabilities. The sides were sponged with Sahara Sand. The patterned paper is from To the Nines by Stampin' Up! Some more tearing, distressing, and sponging to make the previous stuff not so "bright" and the flag "Father's Day" with a corduroy brad (love these!) finished off my card.

But, but there is a twist this week...you need to finish off the inside of the card too! Not something I do very often, so I kept it simple and just brought some of the design elements from the outside to the inside. So more tearing, distressing, and sponging...then it was done. I really love the earthy masculine feel to the card...perfect for Father's Day.

So now you need to check out the creations by the other Sugar Babies: Audrey, Candace, Dana, Julie, Kathy, Nancy, Renata, and the Sugar Mama, Korin. Better yet make a card yourself...don't forget the twist of finishing off the inside as well...and post it to the Sweet Stop blog for a chance to win a prize! Have fun getting inky, a wonderful Father's Day weekend, and thanks for checking out my kind of engineering!


The Engineering Details
Stamps - Forest Friends (SU!), All Year Cheer III (SU!), Women of Life (Papertrey Ink); Paper - To the Nines Pattern Paper, Sahara Sand, Whisper White (SU!); Ink - Chocolate Chip, Sage Shadow, Sahara Sand (SU!); Accessories - Chocolate Corduroy Brad (SU!), Oval Nestabilities (Spellbinders), Photo Corner Punch (SU!), dimensionals, scissors, sponge

Tuesday, June 15, 2010

A Bridal Shower

So excited to share with you what I put together for my cousin-in-law's bridal shower over the weekend. It was a fun event honoring a very special woman and I really thought it went so very well. I signed up to do the invitations, party favor boxes, and a marital advice tree. And of course, knowing me I can't keep things simple, so I have a lot of late nights getting it all done, but it was worth it for her!

So because I was so excited by the party favor boxes, I will start off with those. I found the patterns for a three-tiered paper box cake that Stampin' Up! had shown in the demonstrator magazine and another version of the cake-shaped boxes that had a base and a lid. Well of course, I liked the three-tiered cake look, but the actual box that had a base and a lid. So I had to create a pattern for the base and lid for each layer of the cake which was based on the overall dimensions that Stampin' Up! did. Like I said, I can never keep things easy! So anyway so Bazzill Basics paper in Pomegranate Splash made up teh base and Basic Grey Bittersweet raspberry cream made up the lids. I scalloped all of the sides of the lid to make it a little prettier.

I knew I wanted to put flowers on somehow and I had seen a couple tutorials for making paper roses, so I gave a couple a try. Of course, my friends (hey girls!) all picked the more time consuming one...I picked it to, but that meant a lot of cutting and gluing for many nights! Anyway, the paper roses in a shimmer white cardstock (tutorial HERE that I used) looked beautiful and added a touch of elegance to it. Then I found to keep the boxes together nicely, I did have to tie a ribbon around each layer...was hoping to avoid this at first, but I think I like the look now.


The invitation was a CASE of a bunch of bride silhouette cards that I had found on Splitcoast. Seriously, I love that site so much when you are in need of ideas...always helps me out! I hand drew a template for the silhouette and then cut out all of them by hand. I embossed the top portion (the bodice) of the dress with the Cuttlebug Textile embossing folder and put a ribbon around the "waist". Then added a couple of punch out (and crumbled) flowers with a sparkle white brad. The "You're Invited" was printed on the cardstock prior to cutting out the silhouette. I loved how these turned out and then I realized that not everyone got that it was a bride silhouette on the front...maybe I should have drew my silhouette differently or something! I am really not sure if anyone got it without me telling them.

Then the last project for the shower was a marital advice tree. We had everyone write a piece of advice for the couple on a card and hang it on a tree I put together. Then when their present was opened, I read off the piece of advice they gave the bride. I thought it was a nice touch. Anyway, the "tree" was a couple of branches that I hot glued together to make a fuller "tree" and then my husband cut some holes in some wood to help me stabilize it in the planter. I spray painted it a solid brown and then added some gold sparkle paint to it to jazz it up a smidge. I wanted to leave it very plain so that if she wanted she could keep it and decorate for each season or holiday or something. The cards were actually kept simple...amazing, I actually kept something simple!

Well there you have it! What do you think? Let me know if there are any questions or anything! Thanks for checking out my kind of engineering!


Related Posts with Thumbnails