 This may be hard to believe, so you may want to sit down...I actually did a workshop over the weekend! It ended up being very small, but I think that everyone had fun! We even had a brand-spankin' new newbie in our small group...so I hope I didn't overwhelm her!! I am not the type of demonstrator to do a lot of workshops...I basically do one a quarter. Not that I turn them down, I just don't have a huge customer base that does the workshop thing. I like to do the stamp camps and such in my home...probably because it is less of me talking!
Anyway, I thought I would share with you the projects that I demonstrated at the workshop...I thought they turned out pretty good and actually showcased quite a few types of products (but then again that might be what overwhelmed the newbie!). The first thing I did was to transform a simple paper lunch sack into an adorable little gift bag. How cute is this!! This is the first time that I have done this...where the idea came from (confident that it is not my own) though I have no idea...probably from someplace in the blogging world. This just used simple stamping in three colors to create the "patterned paper" on the bag which was matted a few times. I used the slit punch to add a scalloped edge to the top of the bag and the bottom of the greeting. Add a couple pieces of ribbon and you have the makings of a cute gift inexpensive gift bag.
The Engineering Details
Stamps - Time Well Spent; Cardstock - Very Vanilla, Perfect Plum, Brocade Blue, Sage Shadow; Ink - Perfect Plum, Brocade Blue, Sage Shadow; Accessories - Blue Grosgrain Ribbon (I think technically it was the French Blue retired one), Antique Brass Brads
 The next thing I did was this card. It was meant to show SU! patterned paper, with coordinating rub-ons and stamp sets, and a little bling! A really simple card, but I think it came out quite striking at the same time.
 The small piece of Bali Breeze Designer Series Paper is layered on some Old Olive cardstock and I paper pierced a line of holes above and below that strip (using the awesome Mat Pack that I could not live without now that I have it!). I layered the flower image from A Beautiful Thing on top of squares of Old Olive and Apricot Appeal. The corners were punched with the Ticket Corner Punch just to give it some interest and I added a little bling to the center. Lastly some rub-ons from the Eastern Elegance collection was added above and below the strip.
The Engineering Details
Stamps - A Beautiful Thing; Paper - Bali Breeze DSP, Old Olive, Apricot Appeal, Taken with Teal, Whisper White; Ink - Apricot Appeal, Taken with Teal; Accessories - Eastern Elegance Rub-ons, Ice Circle Rhinestone Brads, Paper Piercer, Mat Pack, Dimensionals, 1/16" Hole Punch, Ticket Corner Punch
 I love the Pun Fun set, so I just had to use it! This was one of the Make-and-Takes that the ladies did. The main focus here was to give them some experience coloring with Blender Pens and Ink. The birdie was stamped in Basic Black and colored with ink pads and a blender pen. I read about more people actually using the reinkers, but I just squeeze the ink pad together to get a small pool of ink in the lid to dip the blender pen into. We used some punches to create a little frame for our birdie and added a bow. The Barely Banana frame was popped up over the birdie just to give the card some more dimension.
 The Engineering Details
Stamps - Pun Fun; Paper - Pink Passion, Barely Banana, Mellow Moss, Whisper White; Ink - Basic Black, Pink Passion, Barely Banana, Mellow Moss; Accessories - Scallop Circle Punch, 1-3/8" Circle Punch, Dimensionals, Mellow Moss Grosgrain Ribbon, Blender Pen

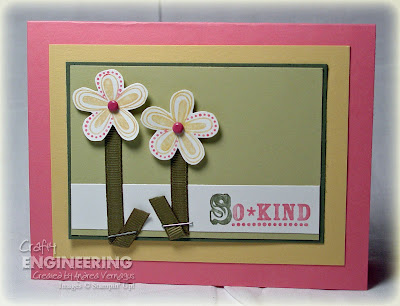
This was the other Make-and-Take that I had them do. I got the adorable idea for using ribbon for the stems of the flowers from another blog and for the life of me, I thought I remembered which blog, but I just checked it and I couldn't find the card I remember! Anyway, I don't take any credit for the cute idea, but I will use it again!
This card showed using markers on the stamps and then I threw a little of the Marker Misting technique that was recently featured on SplitCoast Stampers for a little variation. Basically just inked the flowers and greeting with the markers, misted them with water, and stamped them on Whisper White cardstock. Added a brad to the center of the flowers and popped them up. Then added the ribbon as the stems and used a staple to keep the ends of the "stems" down. Other than that, we just added color with layers.
The Engineering Details
Stamps - Priceless; Paper - Regal Rose, So Saffron, Always Artichoke, River Rock, Whisper White; Ink - Regal Rose Marker, So Saffron Marker, Always Artichoke Marker; Accessories - Rose Red Brads, Dimensionals, 1/16" hole Punch, Scissors, Stapler
Well that was my workshop. I will post my Hostess Gift in another post as this one is quite long now! Have a great rest of the weekend!!


No comments:
Post a Comment