Tuesday, August 28, 2007

Weekend Sketch Challenge (#16)


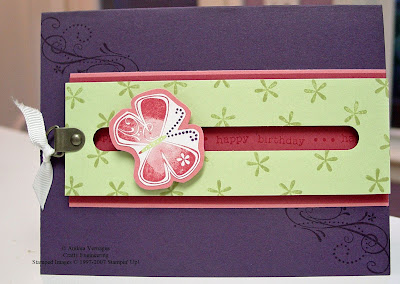
I finally got to try out Beate's Weekend Sketch Challenge. I missed last week...kind of bummed too because it looked like a good one. I needed a Baby Shower card for a friend of mine, so I knew which set I wanted to use....so sad it retired (and yes I think it has been over a year). But the image of the Mom and baby just hits me right in the heart, you know. So what better image for a Mom-to-be?

The one technique that I love, love, LOVE, to do with these sketches type of sets is bleaching. Just emboss the image with Versamark and Crystal Clear Embossing powder and then dip a synthetic paintbrush in bleach and sweep it in the desired areas. The more bleach the whiter it gets or the more color is removed. I tend to only dip once and do a different area at a time so that the resulting color varies some throughout the image.

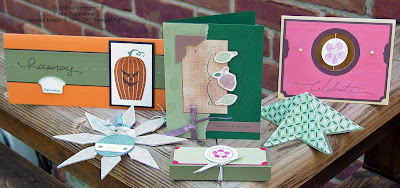
This sketch challenge was a tough one for me. Not really sure what it is, but I am not overly pleased with the card...its missing some layers or something. But alas it was getting late last night and the 5:20 am wake-up was looming a little too close for comfort, so I stopped and called it quits. I think the circles were throwing me off. I don't do much with circles....the engineer in me likes straight edges or something. Plus, since I don' have the cool scallop circle punch that is all of the rage right now (which makes me want one!), I tried to make do with a pair of scallop scissors. Well these scissors are the really cheap ones...I mean really cheap. In fact, so cheap they barely cut the cardstock! So I kind went with it and let the scallops look a little distressed. Sort of worked. Oh well, lots of excuses on this one. Maybe next time!

The Engineering Details

Stamps: Sketches (Retired), Priceless (the little flower), Wonderful Words

Inks: Versamark, Very Vanilla Craft, Elegant Eggplant

Cardstock: Certainly Celery, Elegant Eggplant, Very Vanilla

Other: Crystal Clear Embossing Powder, Sponge, Bleach, Synthetic Brush, Scallop Scissors (non SU! - brand unknown), Certainly Celery Grosgrain Ribbon

Sunday, August 26, 2007

Stamp Camp - September '07

Well I am a couple of days later than I planned on getting this picture out to you! Oh well, I was overcome by actually getting things done this weekend. It was the first weekend in a very long time that my husband and I were both at home. So with babysitters already scheduled, my Mom and Dad, we got an evening out....yeah!

Anyway on to the topic at hand. Here are the hopefully considered fabulous stamp camp projects for my Stamp Camp on Saturday, September 29 (10 am - 2 pm). So for anyone in the Southeastern Michigan area, drop me a line to sign up! There are 3 cards: Scratch n' Sniff, Faux Linen, and Suspension Card and 3 other projects: folded star ornament, chipboard snowflake ornament, and a nugget gift box. Once I hold the stamp camp, I will post pictures of each of the projects individually for those unable to make it. Hopefully I got a pretty good variety for ya' all to make (and I didn't make anything too time consuming...sometimes I don't realize how time consuming a project can be as I am in the design process!). Cost, as usual, will be $15 which includes all supplies, lunch, door prize, and a small gift from me! Hope to fill my house with many stampers!


Tuesday, August 21, 2007

Our Weekend Adventure

When I started this bloggin' thing, my plan was to post a new card or scrapbook page at least once a week and maybe a tutorial once a month. Well, I am going to be a little late this week. If you check out the cutie on the left and you will see why I have a delay. We went camping all weekend and visited Thomas the Tank Engine at Huckleberry Railroad in Flint, MI. My son, Elijah, had such a great time. I think he was simply amazed that their was such a large version of Thomas!

While we were there, we got to go on a small ferris wheel. It was kind of funny...Eli saw the ferris wheel and ran right to it. This is the first time he has ever seen a ferris wheel, so we were surprised that he really wanted to go on it. But he wanted to go even after we explained that we couldn't get off until the ride was done. So we went on and he loved it! So cute! The picture of the two of us was while we were on the ferris wheel. Eli was so infatuated by the temporary tattoo of Thomas on his arm!

Anyway, I am working on getting my stamp camp projects together...I will be posting them here by Friday! Plus I have to do a baby card by Sunday. So once I get this stuff done I will post so fabulous creations! :P

Tuesday, August 14, 2007

Weekend Sketch Challenge


This is my first time doing a sketch challenge. I decided to do a Beate Sketch Challenge...she, Beate Johns (an amazing artist and stamper)posts the sketches on her blog on Fridays. Beate is a Stampin' Up! Demonstrator too, so she always has great samples using SU! supplies. She always has some cool sketches, so I decided to give it a shot. This is Beate's Weekend Sketch Challenge #14.

I needed a wedding card, so I tried to go somewhat elegant. I, again, didn't have a Bravo Burgundy Craft Ink pad (pretty typical since I only have a few), so I did it the cheater way. First ink your stamp in Versamark and then without stamping the image, ink it with desired Classic ink color. Then stamp the image and emboss like normal. Works pretty well. I had a hard time figuring out what to do with the Hodgepodge Hardware squiggly clip, but I finally managed to tie a bow around it. I knew I wanted something else there besides just the bow and I like how it turned out. I realized though that I need the next circle punch up from what I have...I had to cut the Bravo Burgundy circle by hand. What do ya think! Only problem is the card is going to my co-worker, a boy...not many girls in engineering, so he probably will look right past the beauty of my creation. Oh well!!

The Engineering Details

Stamp Sets: Heartfelt Thanks, Wonderful Words

Inks: Sage Shadow, Bravo Burgundy, Rose Red, Versamark

Cardstock: Sage Shadow, Rose Red, Bravo Burgundy, Whisper White

Accessories: Hodgepodge Hardware - Pewter, Burgundy Grosgrain Ribbon, 1-3/8 Circle Punch, 1/16" Circle Punch, Dimensionals, Glue Dots (to hold ribbon on)

Sunday, August 12, 2007

Choose Your Family Promotion

Have you ever, and I mean ever, thought about becoming a Stampin' Up! demonstrator? If you have, NOW is the time to join!

Between Grandma Louise (who drips with sweetness) and your oh-so-suave brother, Vic, you know that in life you can't choose your own family. But at Stampin' Up!, we've found a way to bend the rules so you can!

Purchase the Starter Kit between August 10 and September 30, and you'll get to pick the family of your choice-color family, that is-of Classic Stampin' Pads® FREE. That's a $57.95 value! And we've designed our exclusive coordinating color families (including our In Color collection) so that every color fits in. After all, it's all in the family!

If you would like to know more, please contact me! I would love to have you in my family!

A Birthday Gift

My neice had a birthday in July and she is getting to an age where buying gifts for her is becoming difficult. You know, the time when you can't buy them the fun toys anymore becuase they are starting to outgrow them. Back in February, I went to one of her gymnastics meets (unbelievable how flexible this girl is!) and took a bunch of pictures of her. So I thought I would frame some of th good ones for her. Anyway, I totally didn't even intend on stamping the mat, but all of the sudden in dawned on me that would be cool. So here it is! Pretty simple and totally pink! I was pretty happy with how it turned out and she really liked it. Check out the hold in the bottom picture...probably one of the reasons she got 1st place in her age group for the balance beam at that meet!

Engineering Details


Stamp Sets: Polka Dots & Paisley

Cardstock: Rose Red, Whisper White

Inks: Rose Red, Regal Rose Marker, Rose Red Marker, Versamark

Accessories: Silver Brads, Silver Embossing Powder

To go with her gift, I made a really cool card! I made a Spinner card and it is so fun! The butterfly spins as you tilt the card side to side. It is irresistable to even adults once they see what it does! Oh and this was made with the new Priceless set...I totally love this set! When I got it for some reason I wasn't sure I totally liked it but it seemed to be of the style that seems popular right now. But now that I have used it, I have fallen in love with it! So you may be seeing more of it here. If you would like to try a spinner card, you find directions at SplitCoast Stampers (awesome site by the way) here.


The Engineering Details

Stamp Sets: Priceless, Everyday Flexible Phrases

Cardstock: Elegant Eggplant, Regal Rose, Rose Red, Gable Green

Inks: Elegant Eggplant, Regal Rose, Rose Red, Gable Green (markers of all as well)

Accessories: HodgePodge Hardware - Pewter, White Grosgrain Ribbon, Dimensionals, Pennies

Monday, August 6, 2007

A Photo Book Fit for a Dad

Why is it that stamping something for men is so difficult! I struggled with this one for a long time. I had a few customers that requested that I put together a photo book for a Father's Day Gift. Obviously I am not very timely about showing it, but I just got started with this blogging thing just recently. Anyway, I had many iterations of this photo book and I am pretty happy with the end result. I had a stamp camp in June for people to make this book.

The first two photos are the front and back of the book. The front is stamped and embellished and I inked up my son's hand to get a hand print on the back. He walked around with a brown palm for a bit, but he was fine! The Joy on the front was embossed. We actually did it the cheap way (without a craft pad). Since I don't have a lot of Craft pads, we just inked the stamp with Versamark first and then ink it with the color of ink desired. Stamp the image and emboss like normal. Makes it easy to get nice colors for the embossing without owning all of the craft pads.
I had originally started the front without the Brocade Blue cardstock on the front, but found once it was added, that it finally felt complete.

The pictures below show the inside of the photo book. It is an accordion fold book that is great because my husband can stand it up open on his desk at work. Who wouldn't want to have that cute little boy staring back at you all day?!

Since I did this book for a stamp camp, I have directions typed up, but I am not sure how to post documents yet....so just email me if you want the directions. Unfortunately, it does not include pictures, but it is a step-by-step type of directions.


Wednesday, August 1, 2007

One of my Favorites


As I try and fill my galleries with stuff I have done, I thought I would talk about them as well. This is one of my favorite scrapbook page layouts...and it is so simple! You have probably noticed there is no stamping on the page...I felt anything would detract from the pictures on the page...and aren't they the cutest?! That is my little man, Elijah! I have done one of these pages for certain timeframes of his life: 0-3 months, 3-6 months, 6-9 months, 9-12 months, & 12-18 months. I plan to do 18-24 months and then one for every year: Age 2, Age 3, etc. The layout is great because you can move the squares around to give each page a slightly different feel. Plus the colors I use change each time based on the colors in the pictures. These are all pictures I treasure, but I didn't feel they warranted a whole scrapbook page on their own. Plus if I scrapbooked each of these pictures separately, he may never get this scrapbook. Bad enough it probably won't be done until he is 30! Not sure what will happen when a second kid comes along! Oh well, as long as I am having fun, right? No real Engineering Details on this one. All cardstock is Stampin' Up! I got the font from Simply the Best Fonts...one of the free font download sites I use. See the "Places to Visit" section for others I have found.

Stamping Studio vs. Area

O.k. I would post some pictures of my stamping area...well my side of our family room in our walk-out basement...but alas it is quite messy! I know shocker or shockers....the engineer has a messy, disorganized area. Wait scratch that...it isn't disorganized. I know where everything is in that mess! LOL! I do like some of my organizing, so if I do get it cleaned up, I will post some pictures of it. But to inspire you, and I mean majorly inspire you....actually make you so jealous you can hardly stand it, I wanted to share with you a link to another blogger's stamp room. Nichole Heady has possibly the most amazing stamp room I have seen! As that engineering side of me comes out and I see the pictures of her room, I want to reorganize my little area and make it half as beautiful as hers. Anyway, check it out: Nicole's Studio. Hope that you can be inspired as well. Now get organized!
Related Posts with Thumbnails