Wednesday, February 27, 2008

So Very Cute in a tub WAY too Small!


O.k., how funny are these pictures? It still cracks me up to this day...poor kid will probably hate that we did this to him when he is older. The story is we are camping and he got really, really dirty at the playground. Well we had done this with him before during camping trips, but we had used someone else's buckets. This time we had to use our own and he was a just a tad too big (or the bucket was a tad too small)! He really didn't care...he was having fun!

This was the last page that I did during the overnight scrapbooking event I attended. It actually came together faster than any page I have ever made...I even shocked myself! I had just the three pictures and when I set them down on the table to look at them to see if I could envision how I wanted to lay them out, I had laid them down basically as you see them. They looked so good like that...so I went with it! Drew all of the colors for the page from the pictures themselves, so even that part was easy.

The scallop border was done with the slit punch...makes a larger scallop than the corner rounder and then I added the 1/4" circles of summer Sun to accent the border. The bottom of the page needed a little something so I added the frog from last year's SAB set, Very Punny, for really no real reason...there is no frogs anywhere, but the page was green and dealt with water. Makes you think frog, right? For the journaling, I used the word window punch to round off strips of Whisper White in which I added the 1/4" circles to and my journaling. Lastly, I finally used the So Very set (another one of last year's SAB), which I have always liked but never used, for the title. To continue the circle/scallop thing I had going I highlighted the "Cute" with the Scallop Circle Punch. By the way, "Cute" is in Lavender Lace, but for some reason every picture I took wanted to wash that purple there out...looks better IRL!

Still working (o.k. actually still haven't started working) on my son's birthday invitations. Once I get them done, I will share those as well!


The Engineering Details
Stamps - Very Punny (retired), So Very (retired); Paper - Garden Green, Lavender Lace, Summer Sun, Whisper White; Ink - Garden Green, Lavender Lace, White Craft, Garden Green Marker; Accessories - Slit punch, 1/4" Circle Punch, Word Window Punch, Scallop Circle Punch, 1-3/8" Circle Punch; Supplies - Dimensionals

Monday, February 25, 2008

Mud Puddles - Fun in the Rain!


This past weekend, I got together with three of my girlfriends for an overnight scrapbooking event. One of my friend's Aunt puts it together as a fundraiser for the school her daughter attends. We went from around 9 am on Saturday to 1 pm on Sunday, but we did go to sleep in there! I went to bed at around 2 am as my brain started to not function! We had a great time scrappin' and chattin' away! So because I was doing that for most of the weekend and I need to work on some birthday invitations this week, I won't be trying Beate's Weekend Sketch Challenge #36 like I normally would. Oh well, I have my scrapbook creations to show you!

This one was one of my favorites from the weekend. It has absolutely NO STAMPING on it! I know...crazy! It was funny because as I would finish a page that had little to no stamping, I felt the need to announce it like I was in a support group or something...Hi, I'm Andrea and I did not stamp on this page! But, I just love how this came out...maybe it has something to do with the cuteness of the pictures too!

Knowing I had these pictures to scrapbook, I bought the Clear Rain Dots by Cloud 9 Design from Gina K store...she gives you a tiny bag of thank you M&M's with your order...yup they were eaten as soon as I opened the box. These rain dots totally made this page for me! LOVE THEM! Basically this whole page is about the pictures, so the journaling is minimal. My friend found a great quote in one of those Boy Vellum Quote stacks that you can get at Michael's or Joann's, so I added that to the page. The title, journaling, and quote were all just done on a computer and printed on vellum cardstock. I paper pierced parts of them and then added a little Old Olive marker for some little faux stitching accents. Fairly simple, but it did take awhile to get the layout of pictures right...worst part is that I just start cutting the pictures with no real plan in mind and it slowly developed as I started laying the pictures on the page. Love it when things come together!

This week and probably next week, I will post more of my weekend scrapbook creations and I will share my son's 3rd birthday invitations...that is after I make them! Have a great Monday!!

The Engineering Details
Stamps - NONE; Paper - Old Olive, Going Gray, Kraft, Vellum cardstock; Ink - Old Olive marker; Accessories - Clear Rain Dots (Cloud9 Designs); Supplies - Paper piercer, Mat Pack (SU!)

Tuesday, February 19, 2008

Card Transformations & a Recipe

My Stamp-a-Stack over the weekend went great, but as always I did not budget the time correctly for the cards! I felt so bad that we went over the time I set...not for me, but for all of my attendees that tell their husbands what time they will be home! I promise, I swear, to make sure I stay within the times that I say. This probably means I have to make the projects a second time after I have designed them to see how long they truly take...a step that I very rarely take! So to all of my SAS attendees, please accept my apologies for running long and know that I will work to budget my time better in the future!

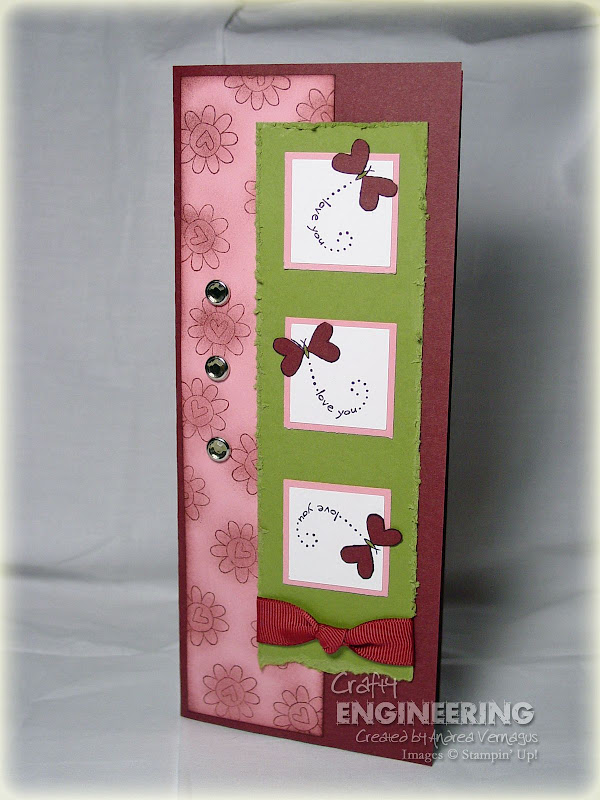
After resting on Saturday night...the Stamp-a-Stack wore me out...I started to do a little stamping on Sunday (when I probably should have been doing laundry or ironing!) and realized that I had a pile of extra cut cardstock sitting out. When I prepare for a workshop I always have extras leftover from the make-and-takes...don't want to not have enough for everyone. Usually I just throw it in my scrap pile, but this time I decided let see what else I can make with the pieces. So the first card is what I had at a workshop. Simple, but utilized the Poppin' Pastels technique and gave them a chance to try the Crop-a-Dile for setting the eyelet.


I just recently got a big order (mostly for SAS supplies), but it had some fun stuff for me as well, including my Sale-A-Bration stamp sets! So I broke out the So Many Scallops stamp set and my scallop circle punch and went to town! The Happy Birthday card was not a huge transformation from the original card...I kept most of the same elements and sizes, just added the scallop circle focal point. I utilized the presents stamp from the retired Something to Celebrate set for the background and then added some Close to Cocoa highlights on the presents.


The Sweet One card turned out to be my favorite. I utilized Beate's Weekend Sketch Challenge 35 for the layout...of course I have a square card and I turned the two little accents, but I think it still counts. The Sweet One stamp from So many Scallops was stamped three times and then paper pieced together and Diamond Stickles was added to the moon. I remembered the star in the set Wondrous Gift is a very good match to the stars in the stamp, so I broke it out and stamp the large star in the three colors on the side and the small stars in Close to Cocoa on the background. I decided on some silver cord (retired from SU!) tied around the bottom...mostly because I didn't have a color ribbon that I felt coordinated right...and then added two star brads from Oriental Trading as my two accents (shown in the sketch). We just found out friends of ours had their baby boy, so now I want to repeat this card with blues for them!


One last one...I wanted to try Beate's sketch one more time...maybe sticking to it a little closer. I broke out my other new Sale-A-Bration stamp set, Birthday Whimsy. Stamped the cake twice, once in Versamark on Perfect Plum and once in Close to Cocoa on Pale Plum. The versamark one was embossed with Crystal Clear embossing powder and then I rubbed Vanilla craft ink over the top to try and highlight the detail on the cake that I felt was getting lost...obviously rubbed off the extra. Layered everything and added a photo corner with eyelets in the corner and a dyed Perfect Plum ribbon with a knot at the bottom. Scalloped the edge of the card using the corner rounder punch...when I did this, I had the card upside down in the punch and it left these little dot impressions on the front of the card, so I paper pierced in those spots. Every mistake has a silver lining...or a piece of cardstock covering it up!

Lastly, the ladies at my Stamp-A-Stack asked me to share the recipe for the soup I served for lunch, so here you go:

Broccoli Wild Rice Soup

1 package (6 oz) Uncle Ben's Chicken & Wild Rice mix
5 cups water
1 package (10 oz) frozen chopped broccoli, thawed
1 medium carrot, shredded
2 tsps dried minced onion (I used onion powder though)
1 can (10.75 oz) condensed cream of chicken soup, undiluted
1 pakage (8 oz) cream cheese, cubed


In a large saucepan, combine rice, contents of seasoning packet, and water; bring to a boil. Reduce heat; cover and simmer for 10 minutes, stirring once. Stir in the broccoli, carrot, and onion. Cover and simmer for 5 minutes. Stir in soup and cream cheese. Cook and stir until cheese is melted. Yields 8 servings (about 2 quarts)


The Engineering Details - Thanks So Much Card
Stamps - Heartfelt Thanks, So Many Sayings (Retired); Cardstock - Close to Cocoa, Vanilla Naturals, Pale Plum, Perfect Plum; Ink - Versamark, Close to Cocoa; Accessories - Stampin' Pastels, blender pen, ticket corner punch, Perfect Plum eyelet; Supplies - Crop-a-Dile, dimensionals


The Engineering Details - Happy Birthday Card
Stamps - So Many Scallops, Something to Celebrate (retired); Cardstock - Close to Cocoa, Vanilla Naturals, Pale Plum, Perfect Plum; Ink - Pale Plum, Perfect Plum, Close to Cocoa, Perfect Plum Marker, Close to Cocoa Marker; Accessories - scallop circle punch, 1-3/8" circle punch, ticket corner punch, Perfect Plum eyelet; Supplies - dimensionals


The Engineering Details - Sweet One Card
Stamps - So Many Scallops, Wondrous Gift; Cardstock - Close to Cocoa, Vanilla Naturals, Pale Plum, Perfect Plum; Ink - Pale Plum, Perfect Plum, Close to Cocoa; Accessories - scallop circle punch, 1-3/8" circle punch, 3/16" corner rounder punch, Diamond Stickles, Silver Cord (retired SU!), silver star brads (Oriental Trading), 1/16" circle punch; Supplies - dimensionals, scissors


The Engineering Details - Birthday Whimsy Card
Stamps - Birthday Whimsy; Cardstock - Close to Cocoa, Vanilla Naturals, Pale Plum, Perfect Plum; Ink - Close to Cocoa, Versamark, Perfect Plum Marker; Accessories - Photo Corner punch, Perfect Plum eyelets, 3/16" corner rounder punch, crystal clear embossing powder, Diamond Stickles; Supplies - heat gun, Crop-a-Dile, paper piercer, Mat pack

Thursday, February 14, 2008

Another Verve Challenge Entry

After my last card for Beate's Weekend Sketch Challenge, I got another idea for the Verve Visual Honored Guest Designer Sketch Challenge Contest (you can see my first card and the sketch here). So after watching an amazing episode of LOST (which I totally have to watch again) I took a break from cutting the cardstock for my Stamp-A-Stack to complete this card. I used the same flower with a couple of changes as my last card and I am really loving these colors again...so I kept them too!


I layered the flower as I did before, but changed a little bit of the coloring...the base flower now has some more Pumpkin Pie color than it did before. I also added some Diamond Stickles to the little circles. This can be seen on the close-up shot a little better. Then I formed the leaves to make up the diamond shape...if it isn't clear, the flower was meant to be the center square from the sketch. The flower was layered on distressed Pumpkin Pie and Basic Black. I layered that all on a strip of Taken with Teal toned down with a vellum layer attached with silver eyelets. I jut got the Mat Pack from SU! and it helped me to really line up the eyelets so they were equally placed...and of course being the engineer I am, this is a very good thing. All of that is on a distressed Rose Red layer on black and finally on the Taken with Teal base. Pumpkin Pie ribbon with the Teal Circle Rhinestone brads add a little accent. Another new thing I just got was some of the new SU! rub-ons! So fun! That is what the "smile" sentiment is.

Well that is my 2nd entry...here's hoping it strikes a chord with the judges! Back to cutting cardstock!

The Engineering Details
Stamps - Time Well Spent; Cardstock - Taken with Teal, Basic Black, Rose Red, Pumpkin Pie, Vellum, Whisper White; Ink - Versamark, Basic Black; Accessories - Black embossing powder, Crystal Clear embossing powder, Ice Circle Rhinestone Brads, Silver Eyelets, Pumpkin Pie Grosgrain Ribbon, Diamond Stickles, Eastern Eclectic Rub-ons, Ticket Corner Punch, Blender Pen, Stampin' Pastels; Supplies - Heat Gun, Dimensionals

Monday, February 11, 2008

Weekend Sketch Challenge

I finished my card last night for Beate's Weekend Sketch Challenge 34. It took much longer than I had anticipated! I had an idea in my head that I was having trouble getting to turn out. So for what it is worth, here is my interpretation of her sketch.

I knew that I wanted to layer the large flower from Time Well Spent. I used Stampin' pastels and a blender pen to color it in. I really like how the shading/highlighting turned out! Kind of impressed with myself on that one. So I may try that aspect of the card again sometime. The large flower is in three layers: the inner circle on a dimensional, the main part which I rotated and put on a couple pieces of cardstock (I didn't want the full thickness of a dimensional), and the base which ends up being mostly just the outer Taken with Teal line. The leaves beneath the flower were stamped and colored and then embossed in clear embossing powder to give them a little shine. I randomly stamped a bunch of the other flowers and leaves on Whisper White in all of the colors of my card and then overlaid that with vellum to tone it down just a little. This is where the trouble began. I couldn't decide how I wanted to attach the vellum...so I sewed the edges, but it came out a little too crooked...then I added the eyelets...then I decided that I needed a greeting or something up by the eyelets...then I couldn't decide if I liked it anymore. Oh well! I also think my background stamping behind my large flower might be a little too much...maybe if I would have just stuck with the leaves. Ahh, I can see I need to try this card again now that my brain is a little more refreshed.

I will be busy preparing for my Stamp-A-Stack on Saturday the rest of the week...lots of cardstock to cut! So I apologize in advance for my silence! Have a great week!!!

The Engineering Details
Stamps - Time Well Spent, Happy Everything; Cardstock - Old Olive, Pumpkin Pie, Taken with Teal, Whisper White, Vellum Cardstock; Ink - Old Olive, Pumpkin Pie, Taken with Teal, Rose Red, Basic Black, Versamark; Accessories - Black embossing powder, Crystal Clear embossing powder, Ice Rhinestone brad, Silver Eyelets, Moss Gingham Ribbon, sewing machine; Supplies - dimensionals

So Sweet at 9 Months


Thought I would show you a scrapbook page I got done during my last Girls scrapbooking day...only one page done...I usually hope for two, but oh well! We have an overnight scrapbooking weekend coming up, so hopefully I am fully prepared for that and get lots done!

I love these pages, but they are time consuming because of the journaling. I like to take the professional (well JcPenny's) pictures we have taken and include a recap of what he did and such since the last picture...I try (operative word there) to record stuff on a calendar I keep in his room, so putting the recaps together mean I have to look up stuff in the calendar which helps! We did every three months in the first year, every 6 months in the second year, and now we do once a year. So considering, my son will be 3 soon, I am a little behind! Oh well...he seriously is not getting this scrapbook until he is 30 anyway!

For this page, I really loved the background twinkle lights in the the main picture, so I drew my colors from that with some highlights from his sweater. Then since these were taken in December and he was wearing a snowflake sweater, I added the snowflake chipboard pieces as some accents. Love how they turned out! I covered them with White Craft ink and then embossing them with the Iridescent Ice embossing powder...so pretty and sparkly. I threw So Saffron brads and More Mustard eyelets all over for accents. The background stamping actually was a last minute idea , but I love how it coordinated so well with that twinkle backdrop. I pulled out my old retired Little Shapes because the shapes in there have rough edges which I needed to match the backdrop...here I was thining about trying to sell that one! Lastly I printed the journaling part actually in the Handsome Hunter color! I found some crazy people on SCS that actually figured out the RGB values for all of the SU! colors so you can print in them. So handy!

I will hopefully post my Weekend Sketch Challenge card tonight...still have to complete it. Beyond that, I may be kind of quiet this week as my Stamp-A-Stack is this Saturday and I will be busy preparing for that! Have a great Monday!

Edited to Add: I was asked for the link to the spot I found the RGB color codes for printing in SU! colors, so here you go! RGB Color Codes on SCS

The Engineering Details
Stamps - Little Shapes (retired), Quirky Alphabet & Numbers (retired); Cardstock - So Saffron, More Mustard, Going Gray, Handsome Hunter; Ink - Handsome Hunter, So Saffron, More Mustard, Craft White; Accessories - Snowflake Chipboard (SU! retired), So Saffron brads, More Mustard eyelets, Ticket Corner punch, Iridescent Ice embossing powder; Supplies - Crop-a-Dile, Heat Gun

Friday, February 8, 2008

Valentine Gifts

In addition to the Valentine’s Day cards for the kids at my son’s daycare, I wanted to make some little gifts to give to the girls that care for my son…he loves them so much and they are so wonderful to him! I have seen all over in blogging land, the Target $1 mailboxes that are out for Valentine’s Day. So I headed over and picked up a bunch and also hit Jo-Ann’s to find some Valentine’s Day patterned paper.

The mailboxes are really cute and very easy to cover. I used a 4” x 12” strip of patterned paper to cover the main body of the mailbox and I adhered it using sticky tape. My only tricky part was to punch a hole for the flag…I read before that a ½” circle punch works great for that, but alas I do not have one. So I used a ¼” circle punch and just tried to “make” a ½” circle. Not the prettiest, but I think it worked with out being noticeable. Then just traced the lids of the mailbox onto another sheet of patterned paper and adhered that using Modge Podge…although I think the Tombow Liquid Metal or Multi-purpose Adhesive would work better (but I don’t have any) because the paper could be easily peeled from the lid…just hoping it isn’t handled too much! Then I just decorated the edges of the lids with ribbon again adhered with sticky tape. The little bows were created via inspiration from Nichole Heady’s blog and her instructions here. It makes a nice clean inline bow for a strip of ribbon. I added a little extra decoration with some of the images from the Happy Heart Day stamp set, but I didn’t want to overwhelm the mailbox so I kept it simple.


Then, the best part…I filled it with chocolate and a matching little card. I used the mini note cards from Stampin’ Up! that I realized fit perfectly in the little mailbox. The image in the card is again from the Happy Heart Day set and I paper pieced the heart using the striped paper. Colored the shirt of the mouse and the flower on the heart with Rose red and Chocolate Chip markers. A little Rhinestone sticker (Icons Stickers by Me & My Big Ideas available at Jo-Anns) finished it off! Again kept them simple, but I thought it turned out cute. I hope they like them!

I made a second set with a little bit less girly colors to give to my husband and son. Similar matching card to finish it off...with candy of course!


The Engineering Details
Stamps – Happy Heart Day; Ink – Chocolate Chip, Rose Red Marker, Chocolate Chip Marker; Cardstock – Pink Striped (DCWV From Jo-Anns), Pink Swirl (Sandylion Sticker Designs From Jo-Anns), Rose Red, Chocolate Chip, Whisper White; Accessories – Scallop circle punch, 1-3/8” circle punch, white ¼” grosgrain ribbon, Target $1 Spot mailbox; Supplies – sticky tape, Modge Podge, scissors


Wednesday, February 6, 2008

A Sketch Challenge Contest

Verve Visual is having a little sketch challenge to find an honored guest designer! Well, I am finally going to admit publicly (this is considered public, right?) that one goal I set for myself this year was to make a design team, so I had to give this a shot. Now mind you, I have no idea if I am truly “good enough” for a design team, but I am willing to see if I can make anything come of it. Anyway, for the contest and the chance at a guest designer position, you had to create a card(s) using the sketch provided.

When I saw the sketch, I immediately wanted to use the spaceship from the Pun Fun set…don’t know why, but I went with it. I recently got some star brads from Oriental Trading and thought they would be perfect. The Western Sky pattern paper has one sheet that has rows of stars, so I pulled that for the strip behind the main image and used it to pull the colors of the card together. I paper pieced the spaceship from the patterned paper and the other colored cardstock mainly because I don’t have a marker or stamp pad for the Blue Bayou or River Rock yet…but I really, really like how it turned out. Layered that on River Rock and added an Antique Brass jumbo eyelet where the window is on the spaceship…love these jumbo eyelets (I know, where have I been?!...I am a little slow sometimes!). I distressed the Ruby Red behind the main image with scissors…too cheap to buy the actual distressing tool! The patterned paper strip is sponged on the edges…I think it added something, but it may only be noticeable to me. Finally I paper pierced from behind to make my star brads’ tails…like shooting stars or something like that! I added a little bit of Versamark with the Versamarker to the holes to help them show up a little bit better.

So that is my entry into the honored guest designer contest…we shall see! I may come up with another entry too once I complete some other projects.

The Engineering Details
Stamps – Pun Fun, Sanded; Ink – Basic Black, Ruby Red, Versamarker; Cardstock – River Rock, Blue Bayou, Ruby Red, Western Sky DP; Accessories – Antique Brass Star Brads (Oriental Trading), Antique Brass jumbo eyelets; Supplies – sponge, scissors, paper piercer

Tuesday, February 5, 2008

Weekend Sketch Challenge in the Nick of Time!


I am always running late on getting Beate's Weekend Sketch Challenges done in time...not sure why, but I always am. Almost did not get this one done in time too even though I had the idea in my head as soon as I saw the sketch, but due to my son and husband being sick today, I stayed home to care for everyone and got it done during nap time. It is looking like I may be home again tomorrow...they weren't looking too good as they fell asleep tonight!


Anyway, I love this sketch even though tall cards are a little out of my comfort zone. I also decided to incorporate the SCS Color Challenge color combo too...woohoo double challenge! I have been playing a lot with the Happy Heart Day stamp set (as you will see on my blog) and thought about the butterflies flying around the squares as soon as I saw the sketch. The are stamped in black and then I paper pieced the wings in Baroque Burgundy. The Old Olive background piece was distressed on the edges and torn at the bottom. I added the 5/8" Baroque Burgundy grosgrain ribbon with a knot at the bottom, but decided against adding the tag...just wasn't feeling what I would put on it. The side Pretty in Pink piece was stamped with Baroque Burgundy ink and sponged with the same ink. I didn't have any patterned paper that would work so it was my attempt at making it myself. Thought it turned out pretty good. I like the addition of the Rhinstone brads...although it took a little convincing of myself to part with 3 of them on one card! Not much complicated here, but I am pleased.

The Engineering Details
Stamps - Happy Heart Day; Ink - Baroque Burgundy, Basic Black, Old Olive Marker; Cardstock - Baroque Burgundy, Pretty in Pink, Old Olive, Whisper White; Accessories - Ice Rhinestone Brads, 5/8" Baroque Burgundy grosgrain ribbon; Supplies - sponge, scissors

Monday, February 4, 2008

Valentine Elephant

I freely admit that I went a little bit overboard on this. Looking at the card, you may think how could I call that overboard…simple design, not a lot of layers, a little glitter, but not too much embellishments…but now I tell you that these Valentines are for the other kids in my son’s daycare. So they will be going to children 5 and under. Now you think I went overboard, don’t you? I got a little caught up and was having fun…so oh well!

I love this little Elephant from the Happy Heart Day set. I love elephants in general and this little guy is no exception. Since the Valentines are from my son, I tried not to make it too girly hence the color choice of Ruby Red, Old Olive, and Going Gray. I colored the elephant with watercolor pencils and a blender pen and the flowers/hearts with markers. The scalloped edge at the bottom of the gray is made with the 3/16” Corner Rounder punch…kind of a tedious process for 22 cards, but I persevered to get it done! Then of course the heart that the elephant is holding just screamed for some glitter even though it is from a boy…its Valentine’s Day…how can I deny the little heart glitter?!

I made a few incomplete versions of this card that I am planning on having my son finish for grandparents and Daddy. Once I do that, I will show you his version.

The Engineering Details
Stamps – Happy Heart Day; Ink – Basic Black, Ruby Red Marker, Old Olive Marker; Cardstock – Going Gray, Ruby Red, Very Vanilla, Old Olive; Accessories – 3/16” corner rounder punch, rectangle slot punch, Always Artichoke ¼” grosgrain ribbon, Watercolor pencils, Icicle Stickles; Supplies – blender pen, paper piercer


Baby Update and a New Look

Well I hope you all don’t mind me sharing pictures and such about my life instead of just stuff I have stamped. I love blogs out there that allow you to get to know some of the people beyond their work. So anyway, I wanted to share with you a couple of the latest ultrasound pictures of our baby GIRL! That is right, we found out that Elijah is going to have a baby sister…officially and conclusively! So excited! Anyway I have two pics for you, the first one is the standard ultrasound pic. She (wow that is weird to now be able to reference the baby as she and not it!) seems to always have a hand up by her face or head. In all three ultrasounds now, she has been that way…so sweet! The second is using the 3-D technology! Pretty cool, but maybe a little freaky too. She is pressed up against the uterine wall in the shot and she looks quite gaunt as basically at this point in the pregnancy (20 weeks) she is just skin and bones. The technician said the next ultrasound will give more “adorable” typical baby pictures.


Did you notice the new look to the site? Or are you still looking at that 3-D ultrasound pic…captivating isn’t it? Well, my husband got me Photoshop Elements 6.0 for Christmas and I finally took some time (o.k. a lot of time because I am still figuring this program out!) to create a new bog header! Be nice…it is my first one. It is not the greatest, but I thought it turned out pretty good. So it will be around for awhile…probably until I get a bit more skilled with this program! I have also started adding a watermark to my pics…did you notice? I have been adjusting it here and there, but I am pretty pleased with it. Well that is enough for me. I will be posting some fabulous creations that I did over the weekend soon…I had lots of stamping time (and I am working on revamping my stamping area...stay tuned as that develops!) as my husband and son were out of town! But since they took the camera, I had to wait till they got back to take my pics!
Related Posts with Thumbnails