Friday, April 25, 2008

Simple Camping Page

My girlfriends got together over the last weekend to do some scrapbooking. I only managed to get one page done...for some reason I wasn't in the groove...but I liked how it turned out.
Nothing too crazy here. I was most excited by the cork board letters that I found at JoAnn's. I kept the colors simple with greens for camping and added a little bit or Pumpkin Pie to highlight my son's shirt. I used the Sanded background on the Creamy Caramel torn layer with a little Antique Pewter Ladybug embellishment that I had (from JoAnn's I believe). The center image in the bottom row is popped up to make it stand out a little bit more from the others...my focal point I guess. Added a couple photo corners with eyelets and journaled with my white gel pen. Fairly simple...amazing that it could take so long to create, but then again I went in with absolutely no idea in my head! Oh well!
Have a great weekend! We are visiting Ludington State Park...my husband's parents volunteer to be Lighthouse keepers for two weeks (basically they help to set-up the store), so it is pretty cool to get see the lighthouse without anyone else around!

Wednesday, April 23, 2008

A Thank You

I haven't had much time lately to be very crafty...kind of killing me! I have a growing list of projects I want to work on, but haven't gotten to them. I also have a list of challenges or contests that I want to participate in, but alas I keep missing deadlines due to that lack of time thing lately. Probably has something to do with catching a cold and also caring for my sick son as well...although he got better already, but my cold is still around. Ugh!
Well I did manage to finally get my son's 3rd birthday thank you's completed. I wanted them to have elements from his invitations which you can see here. By the way, did you see the awesome cake I made him that matched his invitation...you can check it out here. I tried to keep them simple so that I could make 16 of them. Basically the car is stamped in So Saffron ink on So Saffron cardstock. I added a strip of black cardstock and some white grosgrain ribbon beneath the cars and added a little "Thank You" circle over top of the ribbon. The starburst circle was created by double punching a scallop circle...punch the cardstock once with the scallop circle punch, then attach it to some thin paper, and punch again with the scallop circle punch so that it is offset from the first set of scallops. I kept the sparkly circles on the wheels from the original invitation and matted the So Saffron cardstock on Basic Black cardstock. I wanted the whole thing matted on Real Red, but I was running low, so I only matted the base of the card. This is probably a little easier to tell in the second picture where it is open some. Finally I added some pierced holes and some white gel pen to accent the image.


The Engineering Details
Stamps - By Land, Happy Heart Day; Cardstock - Real Red, Basic Black, So Saffron; Ink - So Saffron, Basic Black; Accessories - White grosgrain ribbon, Scallop Circle Punch, 1-3/8" Circle Punch, 1/4" Circle Punch, Paper Piercer, Mat Pack, White Gel Pen

Well besides being sick, what else could a 8 month pregnant woman be doing? Laying tile in a bathroom, of course! Seriously! I have been on my hands and knees laying tile in our basement bathroom (which has been under construction for over 3 years!). We did do it in 2 sessions, thankfully, but I was definitely feeling sore the days after! But it is exciting to finally see this bathroom getting completed, so I will endure a little pain! Still a little way to go before it is done, but having the tile in is a huge step...although I still have to grout it...ugh! Oh well!! Have a great week!!

Monday, April 14, 2008

A Gift for My Hostess, My Friend


My workshop over the past weekend was for a dear friend of mine, so I wanted to give her a small hostess gift that I thought she would really like. I don’t do the extravagant hostess gifts that I have seen some other demos do…I have a hard time finding the time or the money, but I like to give them either some product that I know they will use or a homemade gift that they would like. I went the homemade gift route with this one. I had no idea what I was going to make until I stopped at Target the weekend before. There in the $1 Spot were these adorable little glass tea light lanterns. They had red and clear that I remember. My friend loves red (we both have the exact same red couch…I still claim I bought mine first, but we honestly found it at the same time since we were furniture browsing together) and she has it throughout the house in various places. So of course I chose the red lantern.

I am still getting used to the rub-ons, but I knew I wanted to try them on the glass lantern. So I applied the large white flower from Love & Happiness Rub-on collection that was part of SAB this year. Well, even though I thought I was being careful, it did not come out centered. So I added the little LOVE quote in Chocolate Chip Rub-on to the one side of the flower. That definitely helped even it out…so yes, of course, I meant to and had that planned all along! Then I added some Diamond Stickles around the edges of the flower just to dress it up a little.

I think she really liked it, so I was pleased! Then she gave me a present…how sweet is she?! A box of sugar-free chocolate! Ahh the perfect gift for the gestational diabetic! Even though I still have to eat it sparingly, I love having an option at the end of a meal to have a piece of chocolate! Well that is all for now…I am tired once again. Am I really going to be tired for the next 2 months?!? I don’t remember quite having this extent of 3rd trimester tiredness with my first pregnancy, but I am struggling to get through days without a nap right now…not real convenient especially since I work all day! Oh well! Have a great week!

Sunday, April 6, 2008

Another Take and a Sketch Challenge

I still plan to post my hostess gift, but I did this last night and wanted to get it up first. I had some leftover sets from the Make-and-Takes that I did at my workshop, so I decided to make some extras and change things up a bit. This seems to becoming a theme on my blog...card transformations. Anyway, I started with the Happy Bird-Day card that I made for the workshop...you can see it here...and I saw Jen Del Muro's Sketch For You To Try (SFYTT) so thought I could apply the elements on the card to the sketch. She has a great guest designer too, so check it out!
The square with the punched out window and the colored Pun Fun image is the main part that I took from the original card...well besides the colors obviously! I also kept the Barely Banana strip with the Mellow Moss grosgrain ribbon on top of it. I couldn't use all of the same actual cut cardstock from the original and still stay in line with the sketch, so I had to change to a rectangle shaped card and have a longer strip of Mellow Moss. I added the little flowers from the SAB Love & Happiness Rub-ons and some stickles for some sparkle...see the detailed photo below to see the pretty sparkle. I added the scalloped white edge and the scalloped edge to the card to highlight the scallop circle around the adorable hippo.
I really am please with how it turned out. It is a great sketch...so thanks Jen for the inspiration!
I am hoping to maybe get another sketch challenge in at the beginning of this week. My goal is for it to work for my son's 3rd birthday Thank You cards...still haven't made them yet and I am feeling a bit behind now! So we will see how it goes. Hope you have a great week!
The Engineering Details
Stamps - Pun Fun; Paper - Pink Passion, Mellow Moss, Barely Banana, Whisper White; Ink - Basic Black, Pink Passion, Barely Banana, Mellow Moss; Accessories - Scallop Circle Punch, 1-3/8" Circle Punch, Corner Rounder Punch, Mellow Moss Grosgrain Ribbon, Barely Banana Eyelets, Love & Happiness Rub-ons (SAB), 1/4" Hole Punch, Crop-A-Dile, Blender Pen, Diamond Stickles

Saturday, April 5, 2008

Small but Fun

This may be hard to believe, so you may want to sit down...I actually did a workshop over the weekend! It ended up being very small, but I think that everyone had fun! We even had a brand-spankin' new newbie in our small group...so I hope I didn't overwhelm her!! I am not the type of demonstrator to do a lot of workshops...I basically do one a quarter. Not that I turn them down, I just don't have a huge customer base that does the workshop thing. I like to do the stamp camps and such in my home...probably because it is less of me talking!

Anyway, I thought I would share with you the projects that I demonstrated at the workshop...I thought they turned out pretty good and actually showcased quite a few types of products (but then again that might be what overwhelmed the newbie!). The first thing I did was to transform a simple paper lunch sack into an adorable little gift bag. How cute is this!! This is the first time that I have done this...where the idea came from (confident that it is not my own) though I have no idea...probably from someplace in the blogging world. This just used simple stamping in three colors to create the "patterned paper" on the bag which was matted a few times. I used the slit punch to add a scalloped edge to the top of the bag and the bottom of the greeting. Add a couple pieces of ribbon and you have the makings of a cute gift inexpensive gift bag.

The Engineering Details
Stamps - Time Well Spent; Cardstock - Very Vanilla, Perfect Plum, Brocade Blue, Sage Shadow; Ink - Perfect Plum, Brocade Blue, Sage Shadow; Accessories - Blue Grosgrain Ribbon (I think technically it was the French Blue retired one), Antique Brass Brads

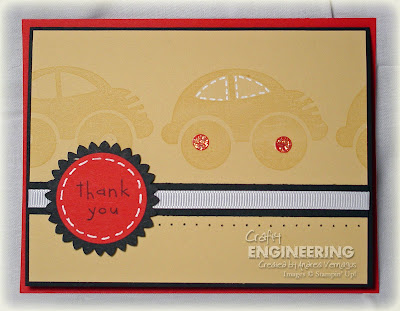
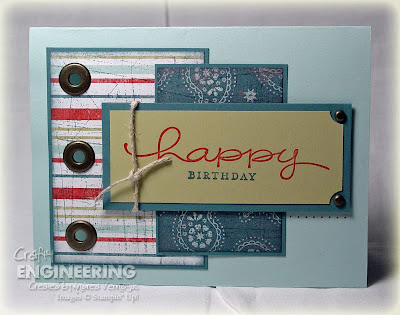
The next thing I did was this card. It was meant to show SU! patterned paper, with coordinating rub-ons and stamp sets, and a little bling! A really simple card, but I think it came out quite striking at the same time.

The small piece of Bali Breeze Designer Series Paper is layered on some Old Olive cardstock and I paper pierced a line of holes above and below that strip (using the awesome Mat Pack that I could not live without now that I have it!). I layered the flower image from A Beautiful Thing on top of squares of Old Olive and Apricot Appeal. The corners were punched with the Ticket Corner Punch just to give it some interest and I added a little bling to the center. Lastly some rub-ons from the Eastern Elegance collection was added above and below the strip.

The Engineering Details
Stamps - A Beautiful Thing; Paper - Bali Breeze DSP, Old Olive, Apricot Appeal, Taken with Teal, Whisper White; Ink - Apricot Appeal, Taken with Teal; Accessories - Eastern Elegance Rub-ons, Ice Circle Rhinestone Brads, Paper Piercer, Mat Pack, Dimensionals, 1/16" Hole Punch, Ticket Corner Punch

I love the Pun Fun set, so I just had to use it! This was one of the Make-and-Takes that the ladies did. The main focus here was to give them some experience coloring with Blender Pens and Ink. The birdie was stamped in Basic Black and colored with ink pads and a blender pen. I read about more people actually using the reinkers, but I just squeeze the ink pad together to get a small pool of ink in the lid to dip the blender pen into. We used some punches to create a little frame for our birdie and added a bow. The Barely Banana frame was popped up over the birdie just to give the card some more dimension.

The Engineering Details
Stamps - Pun Fun; Paper - Pink Passion, Barely Banana, Mellow Moss, Whisper White; Ink - Basic Black, Pink Passion, Barely Banana, Mellow Moss; Accessories - Scallop Circle Punch, 1-3/8" Circle Punch, Dimensionals, Mellow Moss Grosgrain Ribbon, Blender Pen


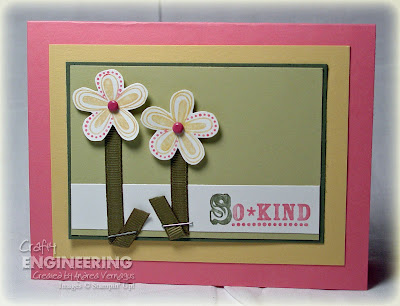
This was the other Make-and-Take that I had them do. I got the adorable idea for using ribbon for the stems of the flowers from another blog and for the life of me, I thought I remembered which blog, but I just checked it and I couldn't find the card I remember! Anyway, I don't take any credit for the cute idea, but I will use it again!

This card showed using markers on the stamps and then I threw a little of the Marker Misting technique that was recently featured on SplitCoast Stampers for a little variation. Basically just inked the flowers and greeting with the markers, misted them with water, and stamped them on Whisper White cardstock. Added a brad to the center of the flowers and popped them up. Then added the ribbon as the stems and used a staple to keep the ends of the "stems" down. Other than that, we just added color with layers.

The Engineering Details
Stamps - Priceless; Paper - Regal Rose, So Saffron, Always Artichoke, River Rock, Whisper White; Ink - Regal Rose Marker, So Saffron Marker, Always Artichoke Marker; Accessories - Rose Red Brads, Dimensionals, 1/16" hole Punch, Scissors, Stapler

Well that was my workshop. I will post my Hostess Gift in another post as this one is quite long now! Have a great rest of the weekend!!
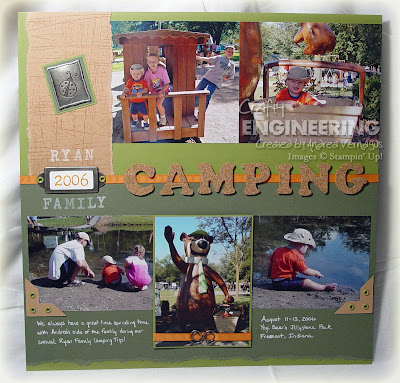
An Awe-inspiring Dunn Twin Update

Many, many of you (some of whom still visit my little blog) helped me send some cards and prayers to a family in need last year. The Dunn Family had twin baby girls, Madeline and Isabella, that were diagnosed with Neuroblastoma Stage 4S cancer. The girls underwent extensive chemotherapy and many procedures to help cure them of their cancer. I have reported before that the girls got a "no sign of cancer" diagnosis at the beginning of this year and the news just got a little better. Their broviac tubes, tubes installed into the chests to allow he chemo drugs and other stuff to be administered, have been removed! This is a huge step in their lives, so I wanted to pass along the good news. Alissa Dunn has written an amazing journal entry on their website (plus there are some ultra adorable new pictures of the girls) that I would love for all of you to read especially since you were part of the prayers and cards that she talks about. So from the bottom of my heart, thank you for helping me pray for this family and take a moment today to realize the amazing power of God and his healing powers!!

Oh and the girls are featured on the Children's Hospital of Detroit's website! Check it out here. Their pictures with their doctors are on the page and then in the little changing window on the right, their story will appear for you to click on. Enjoy!

Wednesday, April 2, 2008

SAS Masculine Card Transformation

In my effort to stay on top of upcoming birthdays and using up cardstock that I had cut for an event, I decided to try another card transformation. These cards were based on this card that my class attendees did at my Stamp-A-Stack back in February. I have one person's set of cardstock cut for that event that never got used (someone cancelled due to being sick), so I am trying to use it up. I didn't quite use it all up, but I did manage to get a few birthdays cards for some guys.


The first card is not the one I like the best. It turned out o.k., but for some reason is not really doing it for me. I used two of he large panels, one of the small panels, and the greeting that you can see on the original. I added some star brads from Oriental Trading and some hemp twine to dress it up a bit. The panels were "distressed" the same way we did in the original: stamped with the Sanded background stamp in Blue Bayou ink on the Western Sky DSP and then the edges are all sponged. Instead of sponging the greeting, I outline the River Rock piece with the Ruby Red marker. O.k. now on to the one that I feel actually turned out!


This card works for me much better. I used one large panel, one small panel, and the greeting from the original. Couldn't find a place for the photo corners, so I removed those. The panels were "distressed" as I described above. I changed the greeting to only have ticket corner punches in two corners of the the River Rock layer and added Antique Brass brads to the corners of the Blue Bayou layer below. I added a little hemp knot on the other side of the greeting. The final addition was to add a row of Ruby Red dots on the bottom side of the greeting. Since this one felt pretty good, I actually made two of this version.

I have some more projects to show later this week (probably the weekend)...the cards and such that I made for a workshop I have on Friday for a good friend. I don't do workshops very often (about once a quarter), so I always get a little nervous for them. It is much easier though knowing it will be basically my girls that I hang out with all of the time...so actually the challenge here is to keep the workshop flowing without chit-chatting the whole time. Anyway, I will share those after the workshop...want to keep them surprised!

Now I need to go to bed. I think the 3rd trimester tiredness is starting to set in...either that or my body is still adjusting to the low carb diet and is going through sugar withdrawal! I was diagnosed with Gestational Diabetes...I was totally expecting it since I had it with my first pregnancy, but it is still hard adjusting to the restrictions. I just try and look at it like I can eat anything i want, I just can only have so much of it. So I have to decide if it is worth how much of a meal it takes up to have it...I can't be going hungry!!! Have a great rest of the week!

The Engineering Details
Stamps - Happy Everything, Sanded; Cardstock - Soft Sky, Blue Bayou, River Rock, Western Sky DSP; Ink - Ruby Red, Blue Bayou, Ruby Red marker; Accessories - Antique Brass Jumbo Eyelets, Ticket Corner Punch, Photo Corner Punch, Antique Brass Star Brads (Oriental Trading), Antique Brass Brads, Hemp twine; Supplies - Dimensionals, sponge
Related Posts with Thumbnails